Installation Guide of HDVC Mobile for Windows
Installing HDVC Mobile for Windows
Please download the installation file from the link below using a Windows computer. Double click the downloaded file to install.
- If you do not have administrator authorisation, input of administration information will be requested.
- If "Windows Defender SmartScreen" is displayed, click "More Info" then click "Run anyway".
- If "User Account Control" is displayed, click "Yes".
- If your Windows PC does not have Microsoft .NET Framework 4 Full, then Microsoft .NET Framework 4 Full will be installed. Please wait during installation. (This may take a few minutes.)


When the dialogue box below appears, click “Next” to continue installation.

Verify the End-User License Agreement.
- Scroll down the screen to verify the End-User License Agreement.
-
If you accept all the terms of the End-User License Agreement, check “I accept the terms of the license agreement”.
* If you check “I do not accept the terms of the license agreement”, installation cannot continue.
- Click “Next”.

Choose destination location.
- Verify the installation destination folder. If it is acceptable, there is no need to make changes.
- Click “Next”.

Click “Install”.

Please wait while the programme is installed.
* This may take a few minutes.

After installation is complete, run HDVC Mobile.
- Check “Run HD Visual Communication Mobile.”
-
Click “Finish”.
* If asked to restart the computer, after restarting, double click the app icon on the desktop to run.
Initial registration of NAT Traversal Service
After running the application, please complete initial registration of the NAT Traversal Service, if necessary.
- Read the letters displayed in the box.
- If you are unable to read the letters, wait 10 seconds or more and click “Reload”. Different letters will be displayed. Please try to read these.
- Enter the letters you read in the input field.
- Click “Next”.

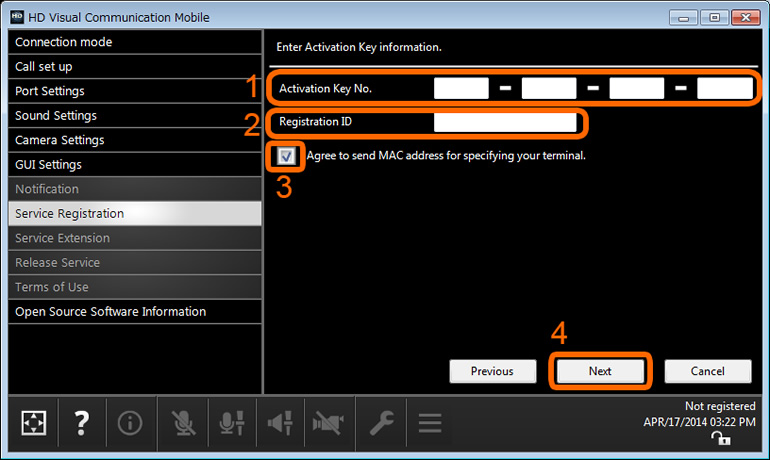
- Tap the app icon to run HDVC Mobile, and enter your Activation Key No. in response to the prompts displayed on the screen.
- Enter your Registration ID.
- If you “Agree to send MAC address for specifying your terminal,” click the check box.
- Click “Next”.

- Click “Please click here for ‘Terms of Use’”, and the NAT Traversal Service Terms of Use will be displayed via the browser. Please verify the contents.
- If you accept the Terms of Use, click the check box.
- Click “Next”.

- Choose and click the Terminal ID you want to use.
- To choose a Terminal ID other than the three initially displayed, tap “Show next Terminal IDs” to display other Terminal IDs that can be used. This operation can be performed up to five times. Once you tap “Show next Terminal IDs,” you will not be able to go back to the Terminal IDs previously displayed.
- Click “Next”.

Your input data will be displayed. Please confirm data and click “Next”.

Copy the Terminal ID and Activation Key No. for your reference, and click “Finish.”

Keep your mobile activation key data (Activation Key No., Registration ID) and Terminal ID in a safe place, as it will be required when you use the application on a different device such as a new computer.