

Screen Transfer
Screen Transfer is a software that allows a computer screen to be displayed onto one or more displays of devices that are connected by wired LAN.
As verification is required in advance, please confirm the following conditions and contact your sales representative with regard to details.
- To stream to displays within the same network.
- To connect the PC and display with a wired LAN and not a wireless LAN.
- To meet the operating environment of the PC.


Latest Version
- The latest version of the Screen Transfer PC software is ver.3.0.0.
- Supports streaming in environments where the network includes a wireless LAN.
- Changes to the equipment management screen (App GUI).
For details, please contact the distributor.
*A software update of the main version flat panel may be required when using additional functions.
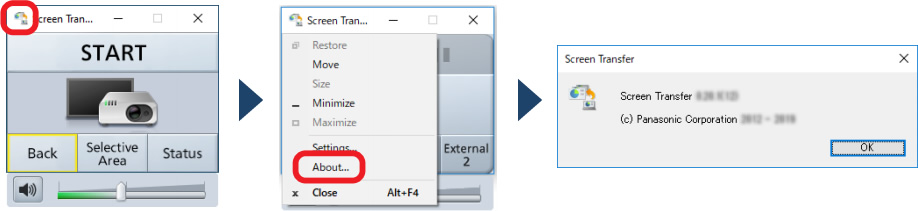
You can check the PC software version using the following method.
Click on the top left of the launcher to display the system menu and select "Version ***".
Compatible Display Models (As of December 2024)
TH-86SQ1H1, TH-75SQ1H1, TH-98SQ2H, TH-86SQ2H, TH-75SQ2H, TH-65SQ2H, TH-55SQ2H, TH-50SQ2H, TH-43SQ2H, TH-98SQ12, TH-86SQ12, TH-75SQ12, TH-65SQ12, TH-55SQ12, TH-49SQ12, TH-86EQ2, TH-75EQ2, TH-65EQ2, TH-55EQ2, TH-50EQ2, TH-43EQ2, TH-86EQ13, TH-75EQ13, TH-65EQ13, TH-55EQ13, TH-50EQ13, TH-43EQ13, TH-75BQ14, TH-65BQ14
1: The Software Main Version 1.10 or later is required.
2: The Software Main Version 4.40 or later is required.
3: The Software Main Version 2.70 or later is required.
4: The Software Main Version 2.10 or later is required.
* Please contact your sales representative with regard to details.
| Version | Ver.2.0 or later | Ver.1.0 |
|---|---|---|
| Number of device connections | Max. 64 units | Max. 8 units |
| Bandwidth | Approx. 10 Mbps (regardless of the number of connected devices) | Approx. 80 Mbps (when 8 devices are connected) |
| Auto reconnection |  |
 |
| Delivery status check | |
|
* Ver.1.0 can be used with Ver.2.0 compatible models, but we recommend using Ver.2.0 or later.
* If Ver.2.0 or later compatible models and only Ver.1.0 compatible models are both installed, you can't use Screen Transfer.
* You can display PC screen to some different models if their compatible software Ver. are same.
* If the equipment you are using is a flat panel display that supports 4K video, the projected image resolution will support up to 1920 x 1080 pixels.
System Requirements
| OS |
Windows® 11 Home Compatible with English or Japanese versions of the above operating systems. |
|---|---|
| CPU |
3rd Generation Intel® Core™ i7/i5/i3 or later processor with integrated graphics |
| RAM | 1,024 MB or more (Recommended 8 GB or more) |
|
Hard Disk Free Space |
100 MB or more (Separate free space is required for saving device data.) |
| LAN | When connecting with wired LAN LAN: 100BASE-TX/1000BASE-T |
| Display Resolution | 1024 x 768 or higher 2048 x 1536 or lower |
- Proper operation cannot be guaranteed if the above system requirements are not met or if a self-built computer is used.
How to install the PC software
You need to install the software on your PC to use the Screen Transfer software.
- Connect the PC and display with a LAN cable.
-
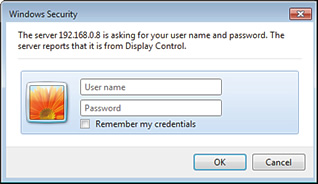
Start up the web browser of the PC, and input the IP address that you set using the "LAN Settings" of the display main unit.

-
Enter the user name and password when the Authentication screen is displayed. See the user manual of the display main unit to confirm the user name and password to be used.
When using the Web control function for the first time, changing the password is required. Proceed to step 4. If you have already used the Web control function, proceed to step 7.
-
Click [OK] to display the page for changing the user name and password.
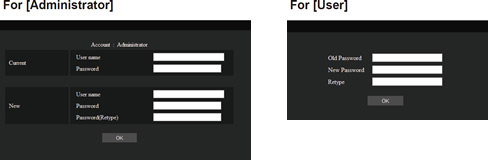
- Enter the new user name and password, and then click [Change].
The screen of step 3 is displayed again. - Enter the new user name and password.
- Click 「OK」to display the Web browser control screen.
Operating with the Web Browser
-
Download the installer for this software from the Web browser control screen.

-
Start up the installer and execute the installation by following the on-screen instructions. When the installation is complete, a shortcut icon will be created on the desktop.
See the user manual for details.
Screen Transfer Ver.3.0 (for Windows)
Screen Transfer Ver.1.0 (For Windows)
