


Using the NFC Function
By using the Near Field Communication (NFC) function (hereinafter referred to as the NFC function), you can read and write projector setting information simply by holding up a device to a projector even while power is not being supplied to the projector.
■ Projectors compatible with NFC function: PT-RQ50K, PT-RQ45K Series, PT-RQ35K2 Series, PT-RQ35K Series, PT-RQ25K Series, PT-RZ14K, PT-REQ15 Series, PT-REZ15 Series, PT-RCQ10 Series, PT-MZ20K Series, and PT-MZ16K Series
- To use the NFC function, you need to purchase an optional NFC upgrade kit and then perform activation and enable the projector NFC function on the projector unit. However, there are models with the NFC function enabled at the time of shipment from the factory, and countries and regions in which the NFC upgrade kit cannot be applied. For whether or not the NFC function can be used in the country or region of purchase, check the NFC Regional Compatibility List or ask your dealer.
- If the projector NFC function is disabled, the NFC screen of the device will be displayed but you will be unable to read and write projector setting information.
- To use the NFC function with an iOS device, iPhone 7 or a later model is required.
- To use the NFC function on an Android device, you need to enable the NFC function of the NFC compatible Android device in advance.
Basic flow for using the NFC function
1. Start up Smart Projector Control
2. Read and write the projector setting information and registration information
Launching of application software
Tap the Smart Projector Control icon to launch the application software.
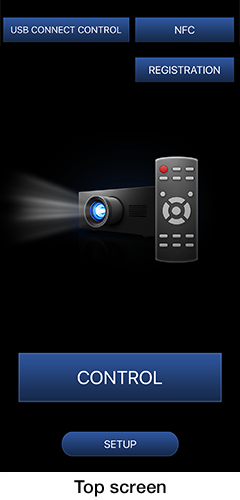
Top screen
When Smart Projector Control starts up, the [Top] screen appears.
Tap the [USB CONNECT CONTROL], [NFC], [REGISTRATION], [CONTROL] or [SETUP] button to perform the intended operation.

- The projector's Web control screen appears.
The Web Control screen allows you to set and adjust the projector and check the projector information from the device.
For details on how to use USB CONNECT CONTROL, please refer to Using the USB Connect Control Function. 
Displays the screen for using the NFC function.
The projector setting information can be read and written by using the NFC function.・For a device not compatible with the NFC function, the [NFC] button will be grayed out and cannot be tapped.

Displays the projector search screen.
You can register a new projector to be operated from the smartphone or edit the registered projector information.
For details on how to use REGISTRATION, please refer to Register the Projector.
Displays the projector selection screen.
You can operate the registered projector.
For details on how to use CONTROL, please refer to Select and Operate the Projector.
Displays the settings screen.
You can set the projector's Auto Registration function or the device’s sound and vibration.
For details on how to use SETUP, please refer to Select and Operate the Projector.
Reading and writing the projector setting information
The projector setting information can be read and written for one projector unit or multiple projector units continuously by using the NFC function.
Notice
For the PT-RQ50K (firmware version 3.0 or above), PT-RQ45K Series, PT-RQ35K2 Series, PT-RQ35K Series, PT-RQ25K Series, PT-RZ14K, PT-REQ15 Series, PT-REZ15 Series, and PT-MZ20K Series
- For the operation to read and write the projector settings using the NFC function, you can select any of [READ/WRITE], [READ ONLY], and [OFF] (read/write prohibited) in the settings on the projector unit side. For details on the setting method, refer to the Operating Instructions of your projector.
- If the software version of this application software is 2.1 or lower, the NFC setting item in the projector setting information is not available. When using the NFC setting item in the projector setting information, update the software version to the latest one.
For the PT-RQ50K (firmware version lower than 3.0), PT-RCQ10 Series, and PT-MZ16K Series
- There is no operation setting menu for the NFC function on the projector unit. Reading and writing are possible regardless of the software version of this application software.
Reading of projector setting information
The projector setting information can be read using one of the following two methods.
- When reading the projector setting information for one projector unit
- When reading the projector setting information continuously for multiple projector units
■ When reading the projector setting information for one projector unit
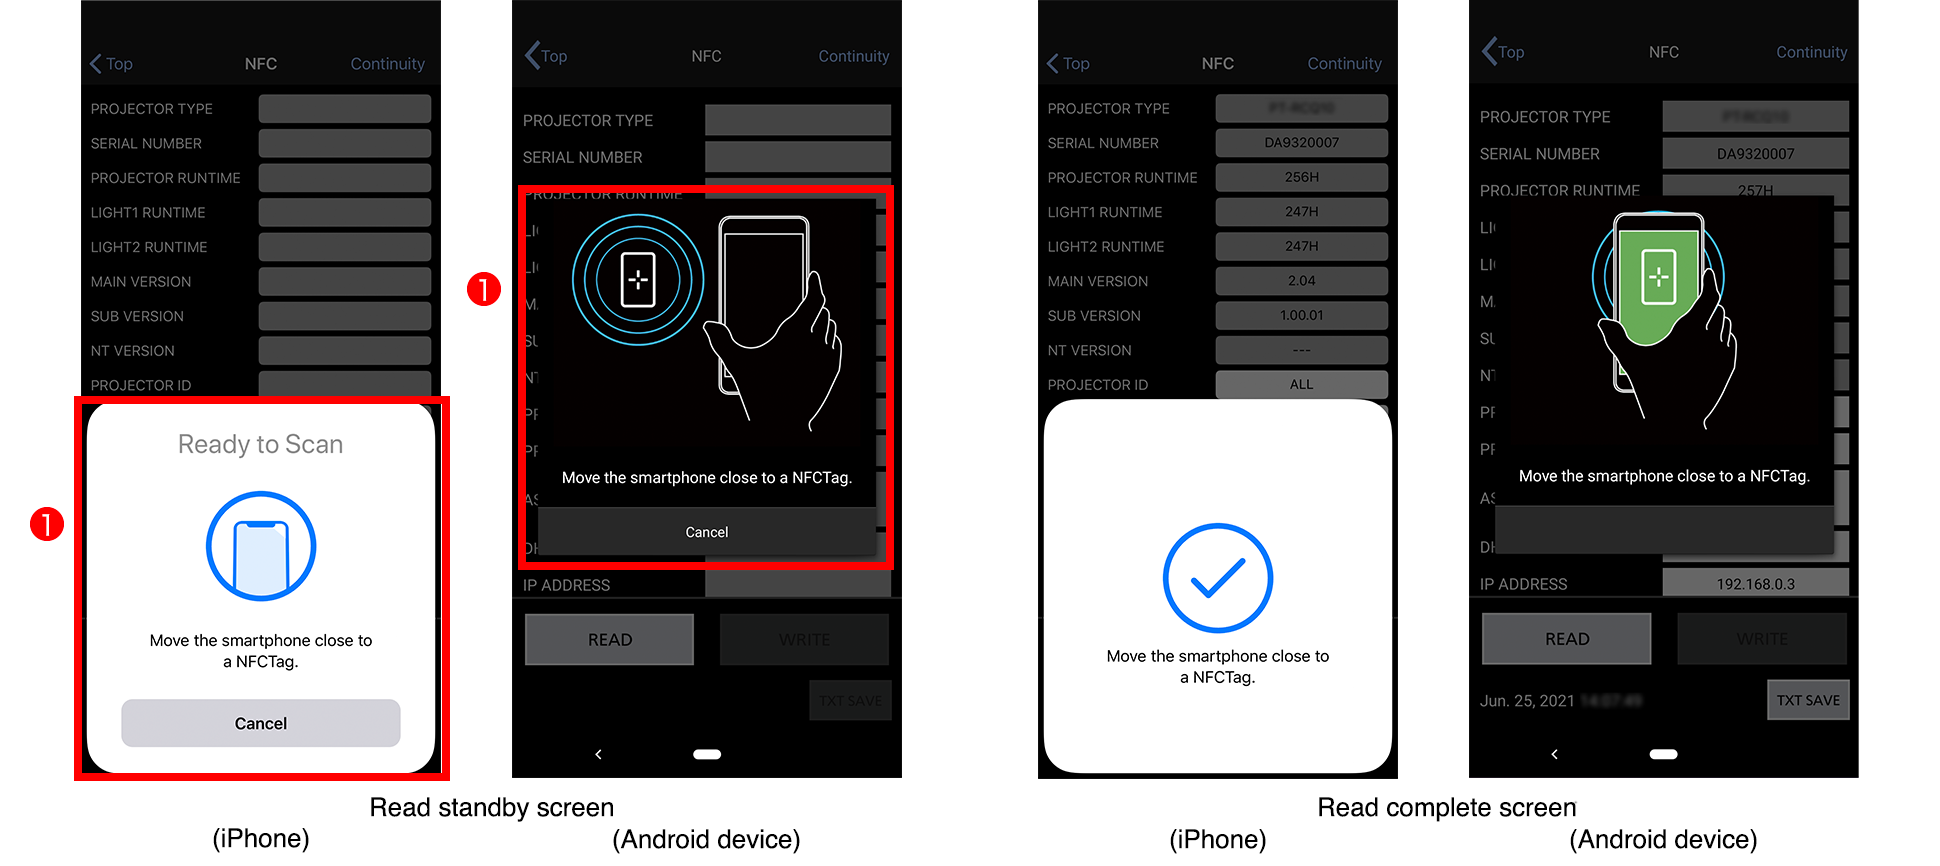
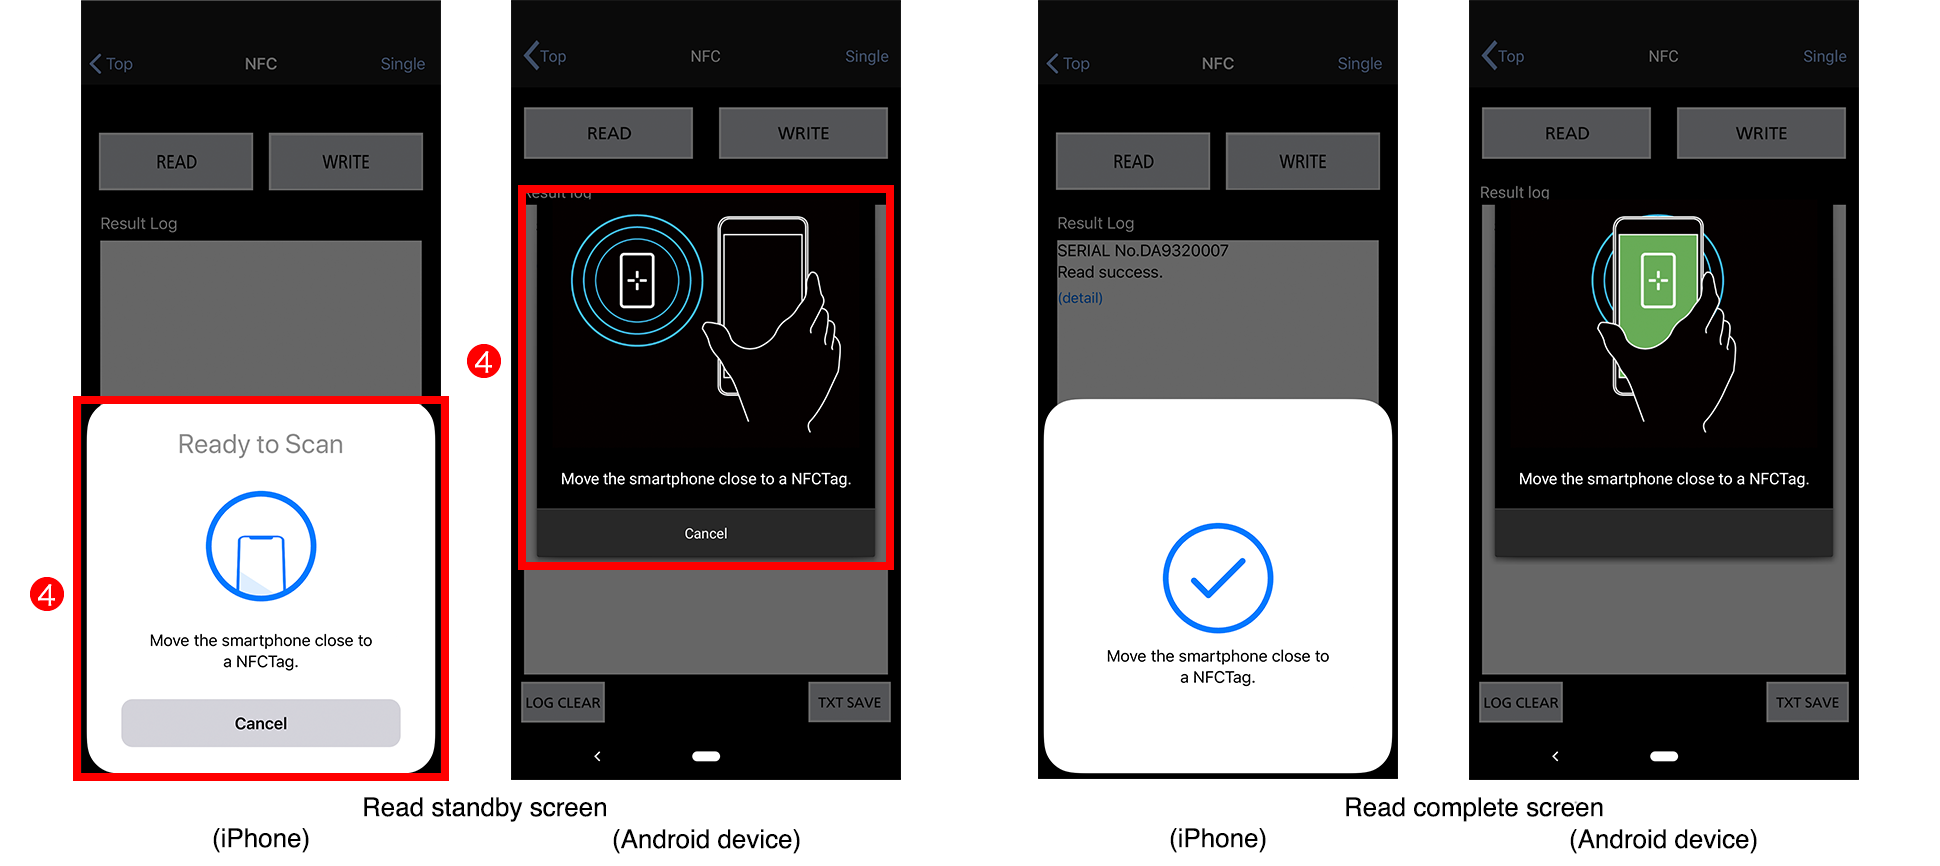
Tap the [NFC] button in the [Top] screen. The read standby screen appears together with the [NFC] screen.
![[NFC] screen after reading completes](img/img_nfc03_02_pc.png)

![[NFC] screen after reading completes](img/img_nfc03_02a.png)
1) Move the device close to the NFC touch point of the projector unit while the read standby screen is displayed.
- ・When reading completes, the reading successful message appears. Then, the screen automatically changes to the [NFC] screen for after reading and the projector setting information is displayed.
- ・If reading fails, a message appears to notify you that reading failed. If reading failed, tap the [READ] button to perform reading again.
■ When reading the projector setting information continuously for multiple projector units
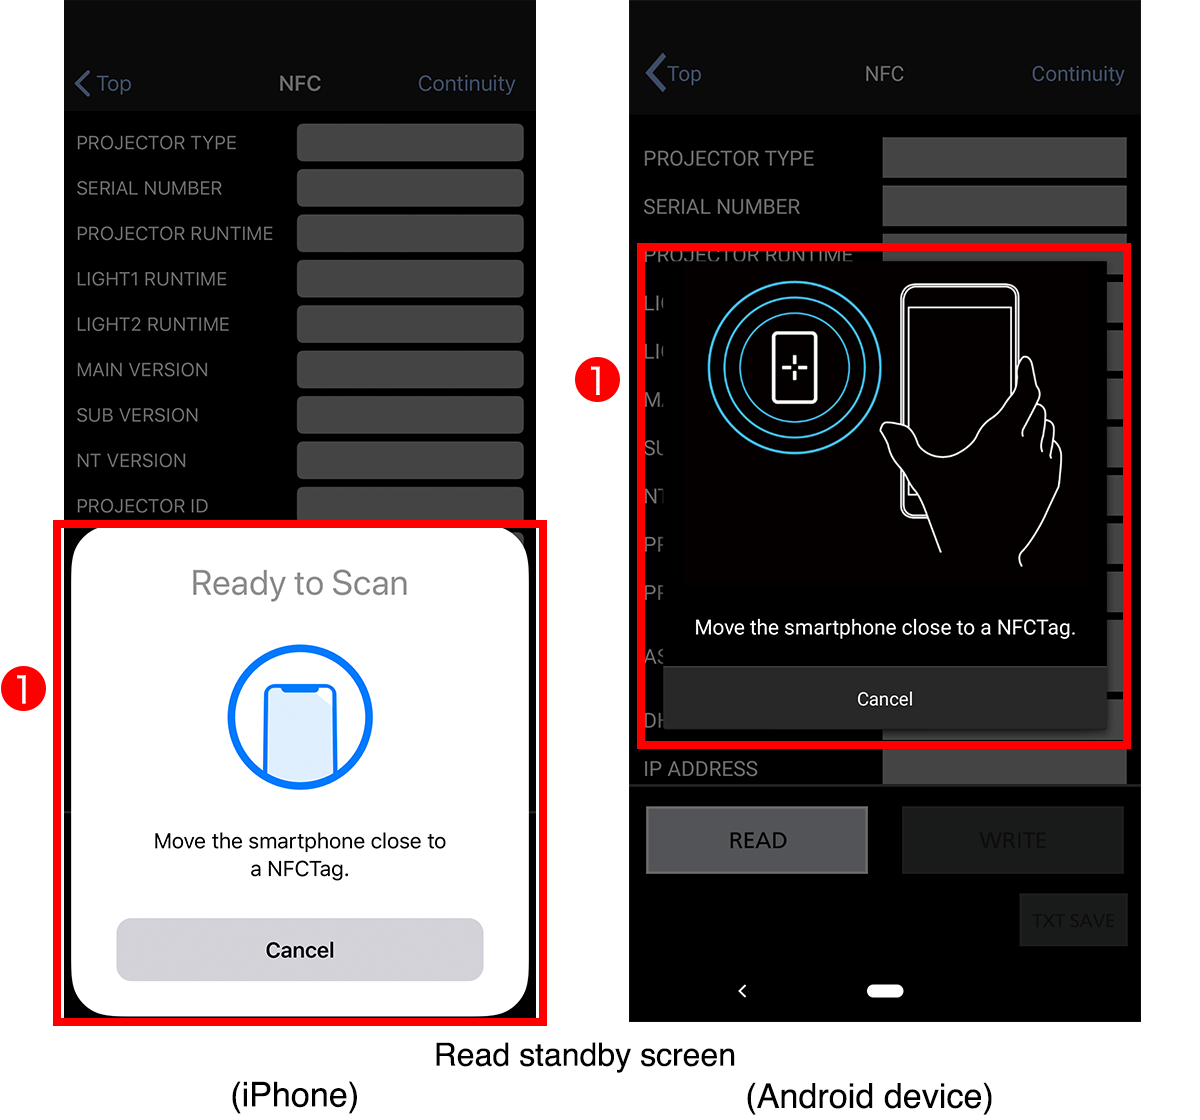
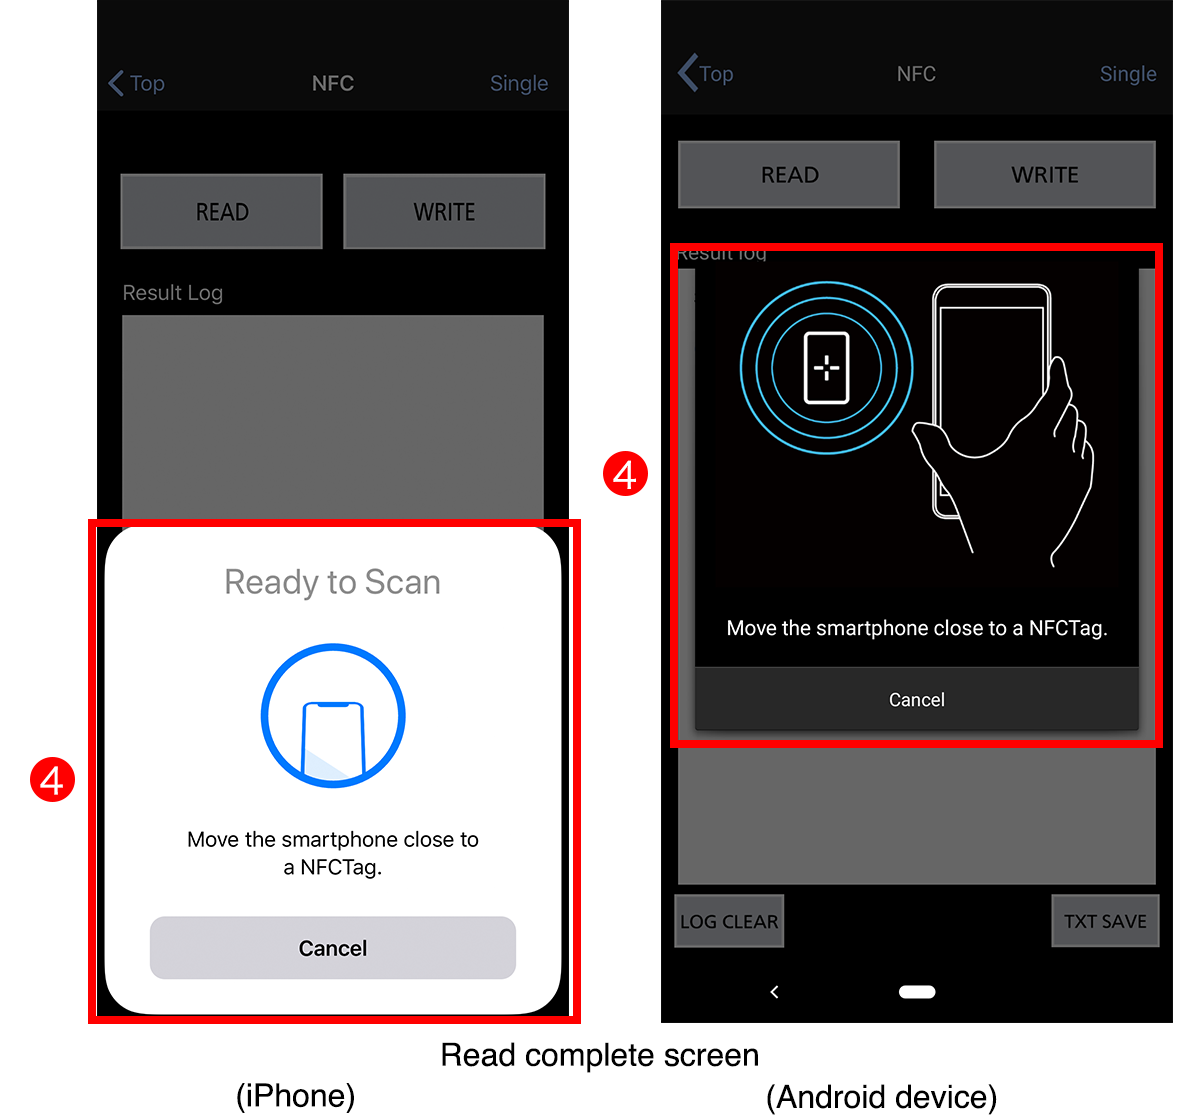
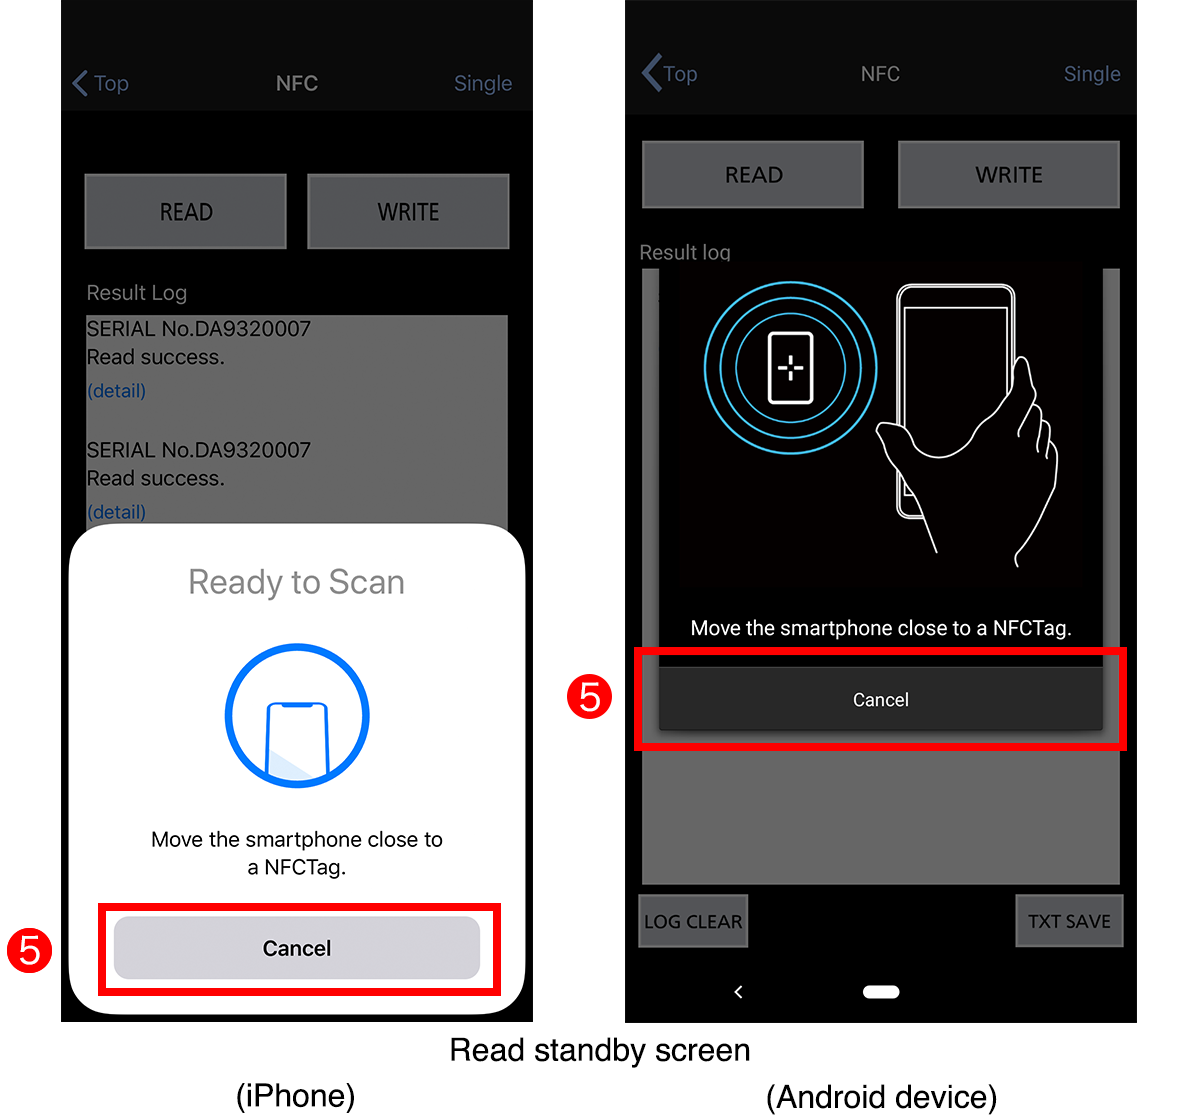
Tap the [NFC] button in the [Top] screen. The read standby screen appears together with the [NFC] screen.
![Read standby screen (iPhone)/(Android device), [NFC] screen for single reading, [NFC] screen for continuous reading](img/img_nfc03_03_pc.png)
![Read standby screen (iPhone)/(Android device), [NFC] screen after continuous reading, Detailed projector information screen during continuous reading](img/img_nfc03_05_pc.png)
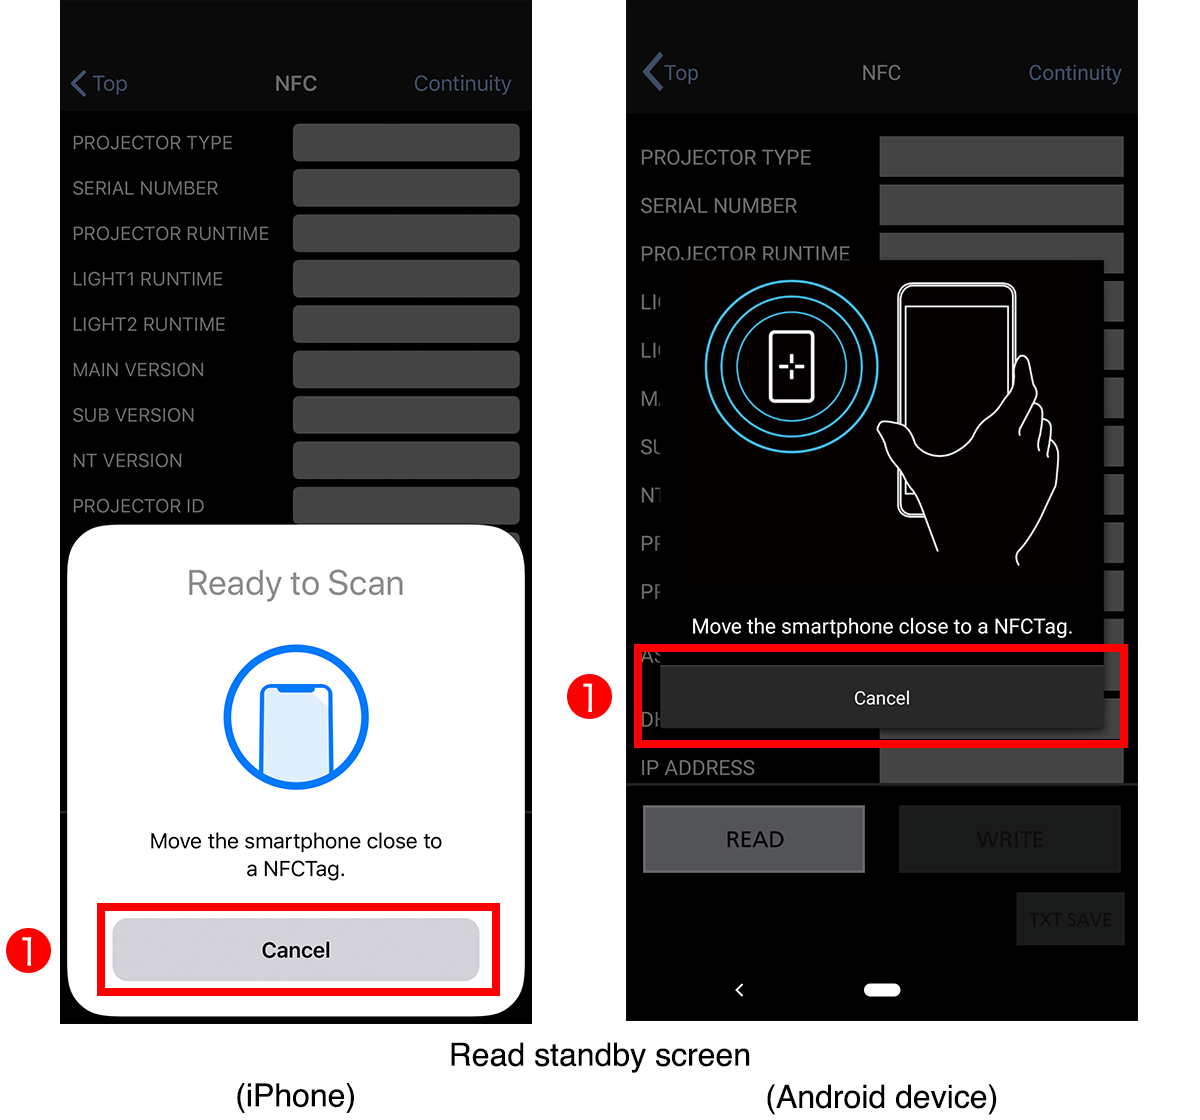
![[NFC] screen for single reading, [NFC] screen for continuous reading](img/img_nfc03_03b.png)
![[NFC] screen after continuous reading, Detailed projector information screen during continuous reading](img/img_nfc03_05b.png)
1) Tap [Cancel].
- ・The [NFC] screen appears.
2) Tap [Continuity].
- ・The [NFC] screen for continuous reading appears.
- ・If you tap [Single] on the [NFC] screen for continuous reading, the display switches to the [NFC] screen for single reading.
3) Tap the [READ] button.
- ・The read standby screen appears.
4) Move the device close to the NFC touch point of the projector unit while the read standby screen is displayed.
- ・After reading, the read standby screen appears automatically.
- ・If you successively move the device close to the NFC touch point of another projector unit, you can read the projector setting information continuously for multiple projector units.
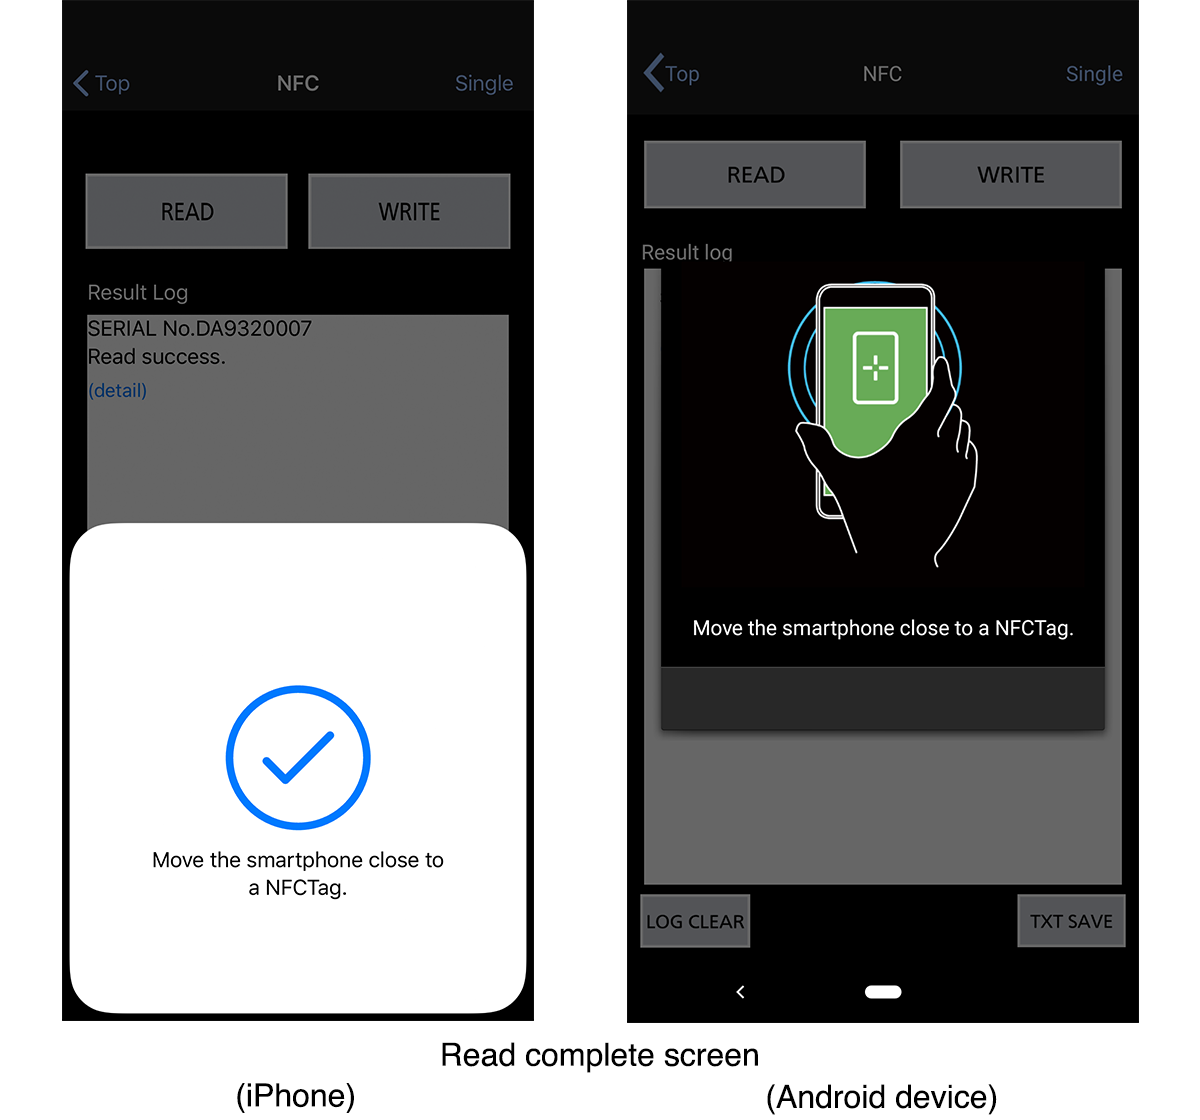
5) To finish reading, tap [Cancel] displayed on the read standby screen.
- ・On the [NFC] screen after continuous reading completes, the reading results appear as [SERIAL NUMBER] for the projector you read.
- ・When reading succeeds, [Read success] appears. Tap [detail] to display the detailed projector information.
- ・If reading fails, [Failed to read] appears. In this case, tap the [READ] button to perform reading again.
Detailed projector information
- PROJECTOR TYPE
- Displays the projector type.
- SERIAL NUMBER
- Displays the serial number.
- PROJECTOR RUNTIME
- Displays the projector runtime.
- LIGHT1 RUNTIME
- Displays the light 1 runtime.
- LIGHT2 RUNTIME
- Displays the light 2 runtime.
- FIRMWARE VERSION*1
- Displays the firmware version.
- MAIN VERSION*1
- Displays the firmware version or the main version of the firmware.
- SUB VERSION*1
- Displays the sub version of the firmware.
- NT VERSION*1
- Displays the network version of the firmware.
- PROJECTOR ID
- Displays the projector ID.
- PROJECTOR NAME
- Displays the projector name.
- ASSET NUMBER
- Displays the asset number and other arbitrarily written information.
- DHCP
- Displays the usage status of the DHCP server.
- IP ADDRESS
- Displays the IP address.
- SUBNET MASK
- Displays the subnet mask.
- DEFAULT GATEWAY
- Displays the default gateway.
- MAC ADDRESS
- Displays the MAC address.
- Crestron Connected
Control System*2
IP ADDRESS
IPID
PORT - Displays the setting information for connecting to Crestron's control system.
For details, refer to the website of Crestron Electronics, Inc.
URL https://www.crestron.com/ - FACTORY RESET
-
- NOT RESERVED
- …The execution of [FACTORY RESET] is not set.
- RESERVED
- …This is the state in which [FACTORY RESET] will be executed when power is supplied next time.
- SELF TEST*3
- Displays the self-test information.
- NO ERROR
- …No error or warning has occurred.
- WARNINGS
- …A warning has occurred.
- ERROR
- …An error has occurred.
- LAST ERROR CODE
- Displays the time that an error last occurred.
If you tap the [DETAIL] button, the error/warning symbol is displayed together with the time (GMT and local date/time*) that the error occurred. For details on the meaning of error/warning symbols, refer to the Operating Instructions of your projector.
*1 The displayed firmware version type changes depending on the projector model.
*2 Control System (IP ADDRESS, IPID, PORT) is compatible with PT-RQ50K, PT-RQ35K2 Series, PT-RQ35K Series, PT-RQ25K Series, PT-RZ14K, PT-REQ15 Series, PT-REZ15 Series, PT-RCQ10 Series, PT-MZ20K Series, and PT-MZ16K Series only.
*3 This function is not compatible with PT-RQ50K, PT-RCQ10 Series, or PT-MZ16K Series.
Notice
- For the position of the NFC touch point on the projector unit, refer to the Operating Instructions of your projector.
- To perform reading again, tap the [READ] button.
- To save the read projector setting information to the device in text format, tap the [TXT SAVE] button.
With iPhone, the data is saved to the Files application.
With an Android device, the data is saved to the internal storage. For the save location in the internal storage, check the message displayed when reading succeeds. - To delete [Reading results] displayed on the [NFC] screen after reading completes, tap the [LOG CLEAR] button. (Only when reading the projector setting information continuously for multiple projector units)
- The saved data can be transferred to other application software.
- Do not move the device away from the NFC touch point of the projector unit until the read complete message appears.
Writing of projector setting information
The projector setting information can be written using one of the following two methods.
If a DHCP server is used, those settings cannot be written continuously to multiple projectors using this application software. Configure the projectors one unit at a time.
- When writing the projector setting information for one projector unit
- When writing the projector setting information continuously for multiple projector units
■ When writing the projector setting information for one projector unit
To write the projector setting information, you need to read the projector setting information in advance.
Tap the [NFC] button in the [Top] screen. The read standby screen appears together with the [NFC] screen. Perform reading following the procedure in “When reading the projector setting information for one projector unit”. The [NFC] screen appears after reading completes.
![[NFC] screen after reading completes, [NFC] screen for single reading, Authentication screen](img/img_nfc03_06_pc.png)
![[NFC] screen after writing completes](img/img_nfc03_08_pc.png)
![[NFC] screen after reading completes, [NFC] screen for single reading](img/img_nfc03_06a.png)

![[NFC] screen after writing completes](img/img_nfc03_08a.png)
1) Tap the [READ] button to perform reading.
- ・The writable projector setting information is displayed.
Writable Projector Setting Information
- PROJECTOR ID
- Select from ALL or 1 to 64 for the projector ID.
- PROJECTOR NAME
- Enter the projector name.
(Allowed characters: Up to 16 single-byte alphanumeric characters and symbols) - ASSET NUMBER
- Enter the asset number and other information.
(Allowed characters: Up to 24 single-byte alphanumeric characters and symbols) - DHCP
- ON
- …If a DHCP server exists on the network to which the projector is to be connected, obtains the IP address automatically.
- OFF
- …If a DHCP server does not exist on the network to which the projector is to be connected, set [IP ADDRESS], [SUBNET MASK], and [DEFAULT GATEWAY].
- CLOSE
- …Closes the selection options.
- IP ADDRESS
- If a DHCP server will not be used, enter the IP address (IPv4).
(Allowed characters: Up to 15 single-byte alphanumeric characters, symbols, and periods (.)) - SUBNET MASK
- If a DHCP server will not be used, enter the subnet mask.
(Allowed characters: Up to 15 single-byte alphanumeric characters, symbols, and periods (.)) - DEFAULT GATEWAY
- If a DHCP server will not be used, enter the default gateway address.
(Allowed characters: Up to 15 single-byte alphanumeric characters, symbols, and periods (.)) - Crestron Connected
Control System*1
IP ADDRESS
IPID
PORT - Enter the setting information for connecting to Crestron's control system.
- (Allowed characters:
- IP ADDRESS Up to 15 single-byte alphanumeric characters, symbols, and periods (.)
IPID Up to 5 single-byte numbers
PORT Up to 5 single-byte numbers)
URL https://www.crestron.com/ - FACTORY RESET
-
- NOT RESERVED
- …Select this to cancel the planned execution of [FACTORY RESET] which is currently set.
- RESERVED
- …Select this to execute [FACTORY RESET].
[FACTORY RESET] will be executed when power is supplied next time. To execute [FACTORY RESET] immediately, turn the power of the projector off and then back on.
- CLOSE
- …Closes the selection options.
- LOG CLEAR
- LAST ERROR CODE can be cleared by writing while this check box is selected.
LOG CLEAR only clears the error log saved to the NFC function. It does not clear the error log saved to the projector unit. Therefore, LAST ERROR CODE will appear again if the error state of the unit continues.
*1 Control System (IP ADDRESS, IPID, PORT) is compatible with PT-RQ50K, PT-RQ35K2 Series, PT-RQ35K Series, PT-RQ25K Series, PT-RZ14K, PT-REQ15 Series, PT-REZ15 Series, PT-RCQ10 Series, PT-MZ20K Series, and PT-MZ16K Series only.
2) Change the writable projector setting information.
- ・Scroll the screen to display the projector setting information.
- ・Any item displayed in gray cannot be written.
- ・When you change the projector setting information, the [WRITE] button is enabled.
- ・If the administrator account for the projector is not set, a confirmation screen appears. Configure the settings of the administrator account for the projector and then change the projector setting information. The setting method of the administrator account for the projector differs depending on the projector model.
- For the PT-RQ45K Series, PT-RQ35K2 Series, PT-RQ35K Series (firmware version 1.01 or above), PT-RQ25K Series, PT-RZ14K, PT-REQ15 Series, PT-REZ15 Series, and PT-MZ20K Series
The administrator account setting screen appears. Enter the administrator account user name and password you want to set in [User Name] and [Password], tap the [OK] button, then configure the settings for the administrator account of the projector.- For the PT-RQ50K, PT-RQ35K Series (firmware version lower than 1.01), PT-RCQ10 Series, and PT-MZ16K Series
The administrator account cannot be set in this application software. Configure the settings of the administrator account on the projector unit.
3) Tap the [WRITE] button.
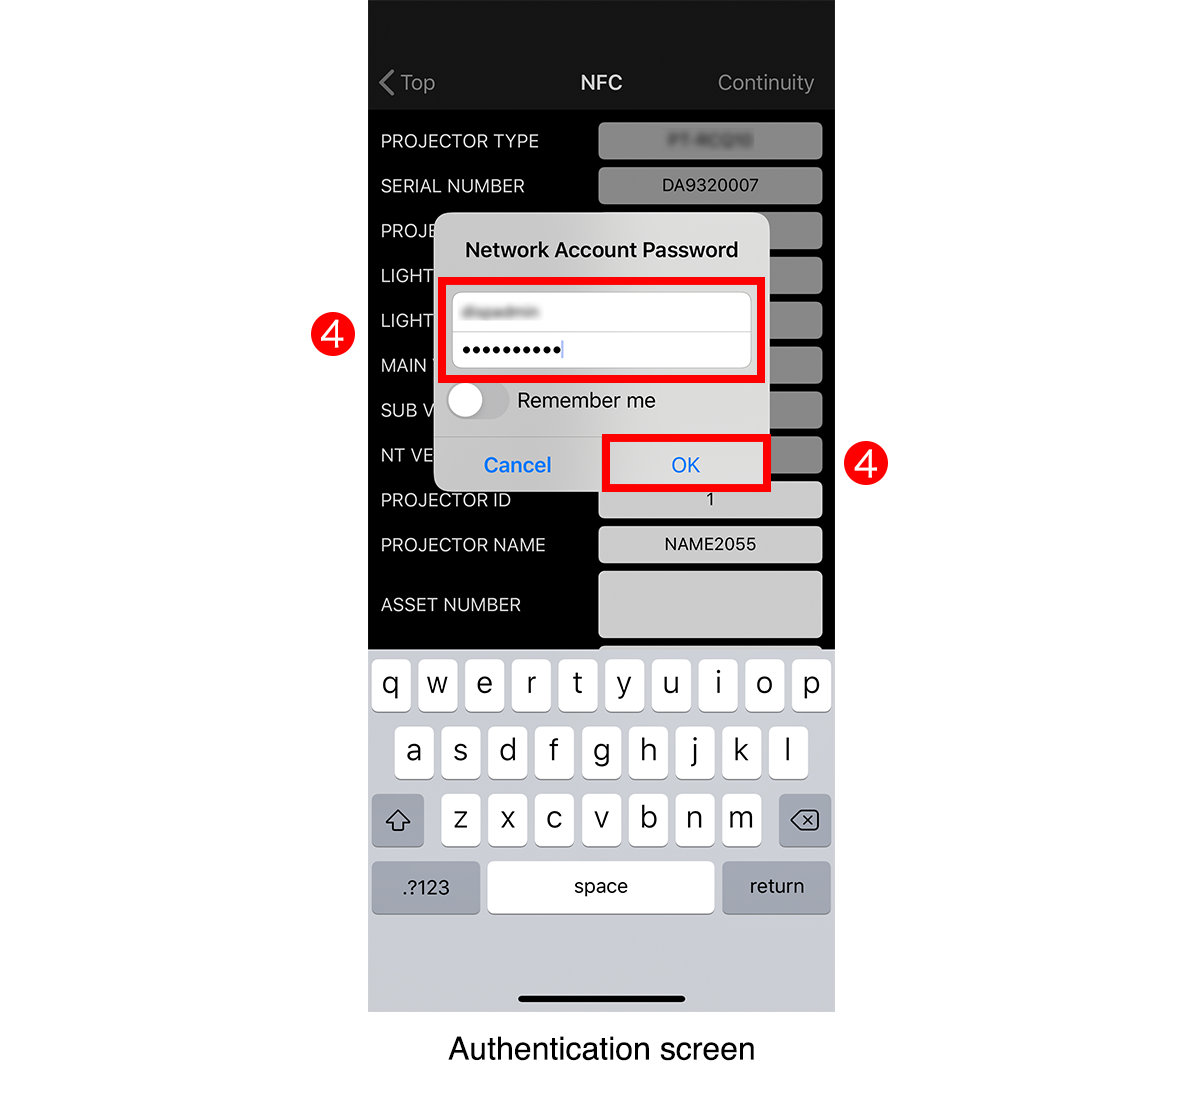
- ・The authentication screen appears.
4) Enter the information of the administrator account set for the corresponding projector in [User Name] and [Password] and then tap the [OK] button.
- ・When an administrator account was set for the first time in step 2), enter the same information in [User Name] and [Password].
- ・If you check [Remember me], [User Name] and [Password] will be entered automatically from next time.
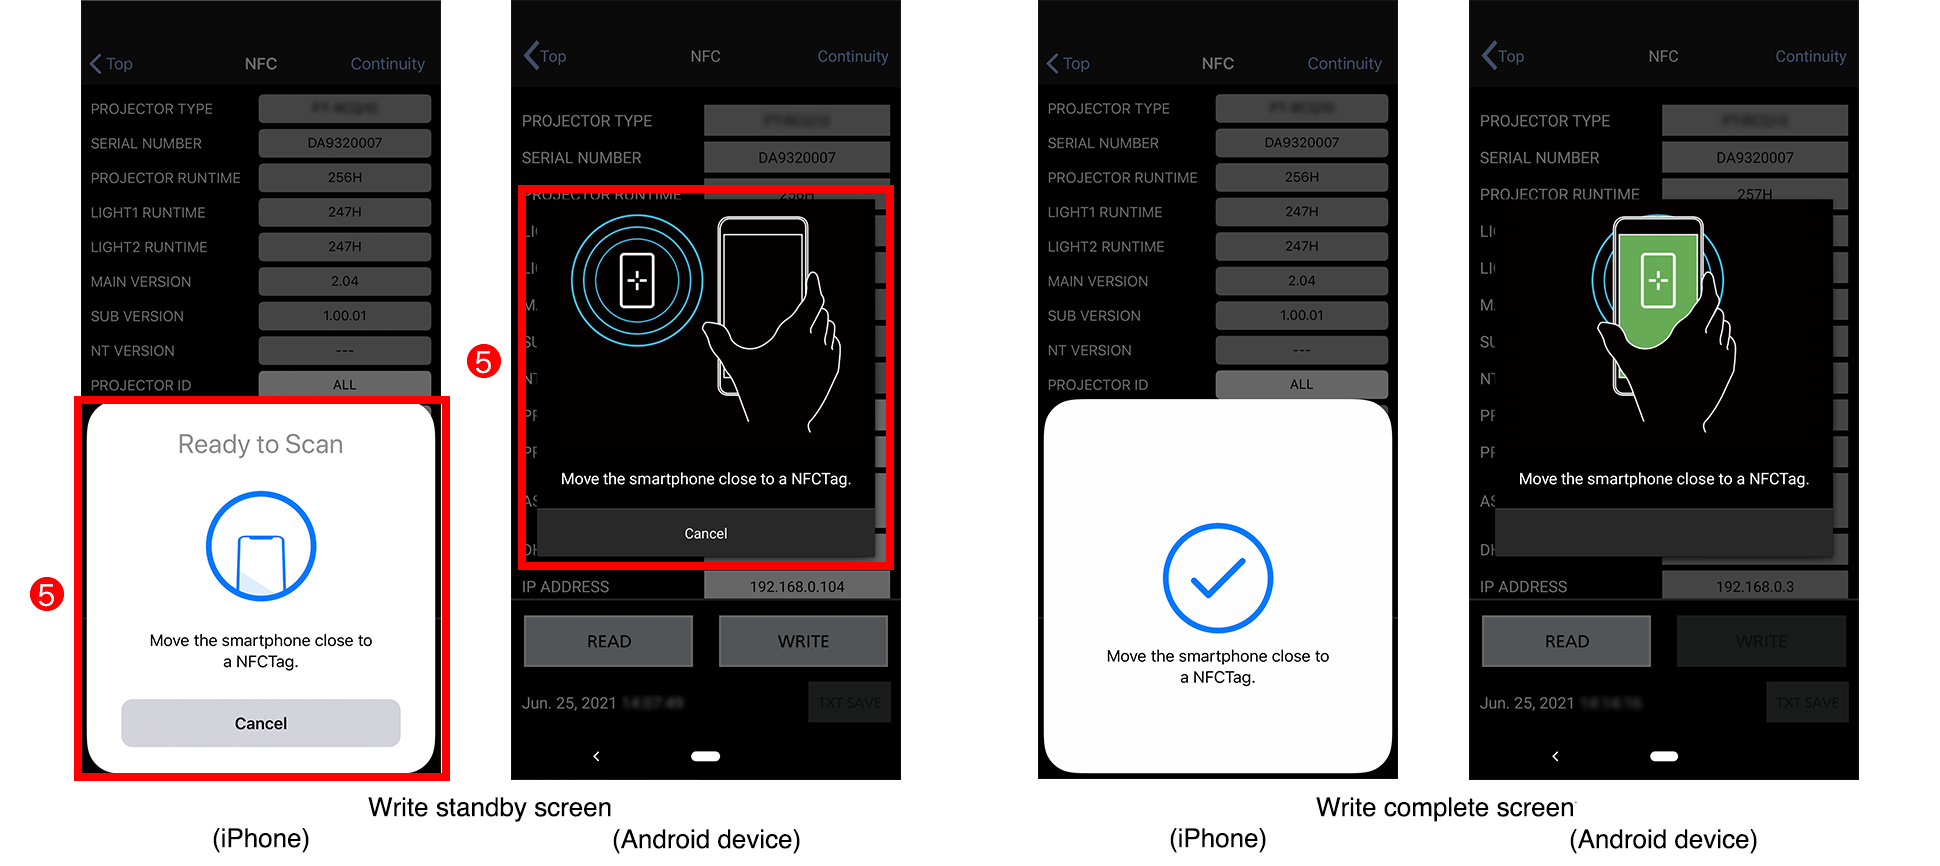
- ・The write standby screen appears.
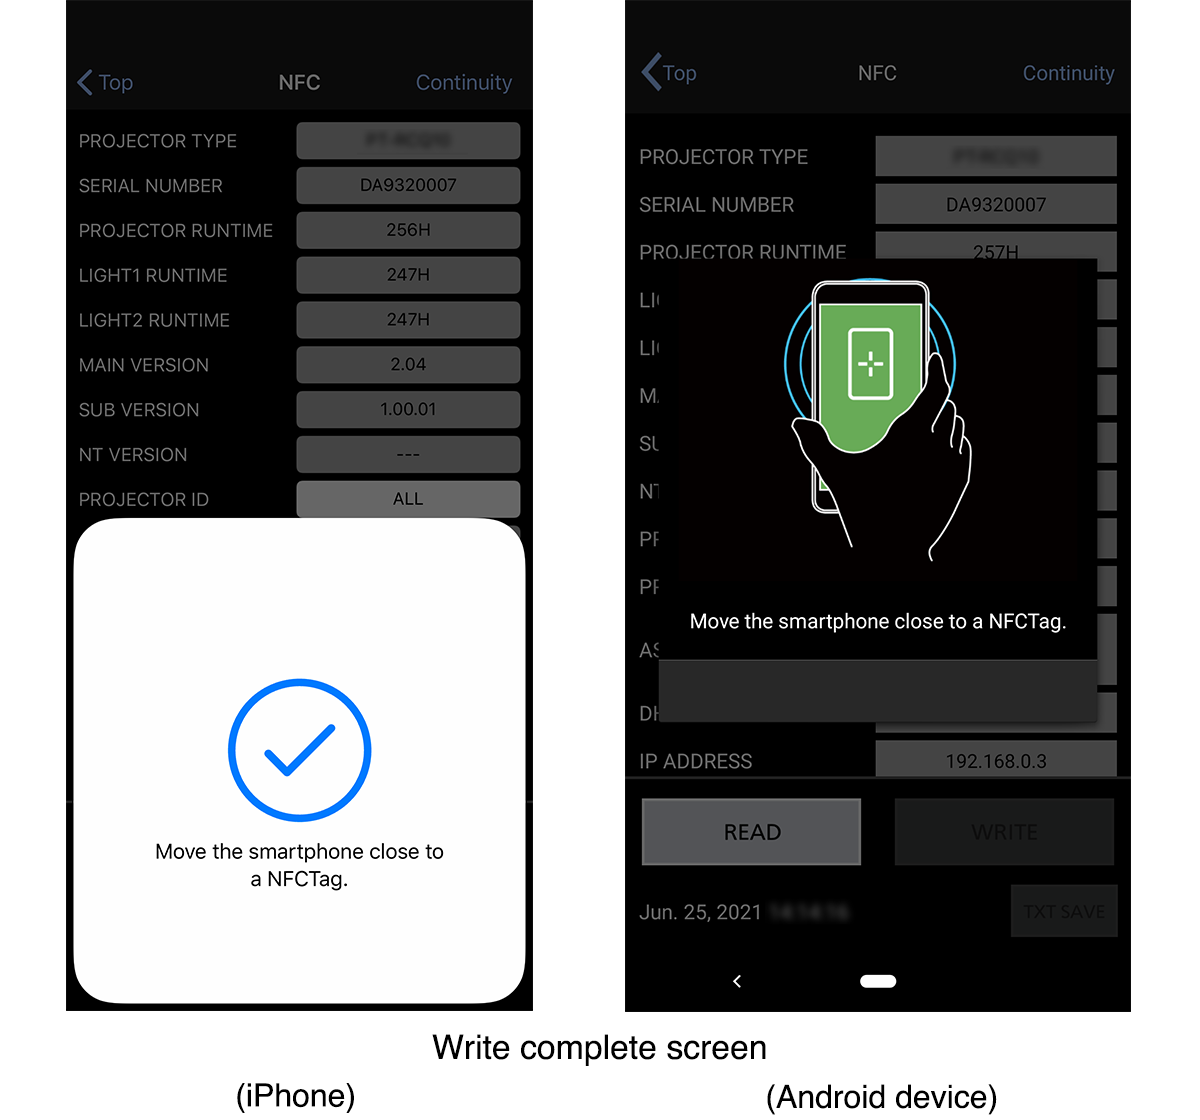
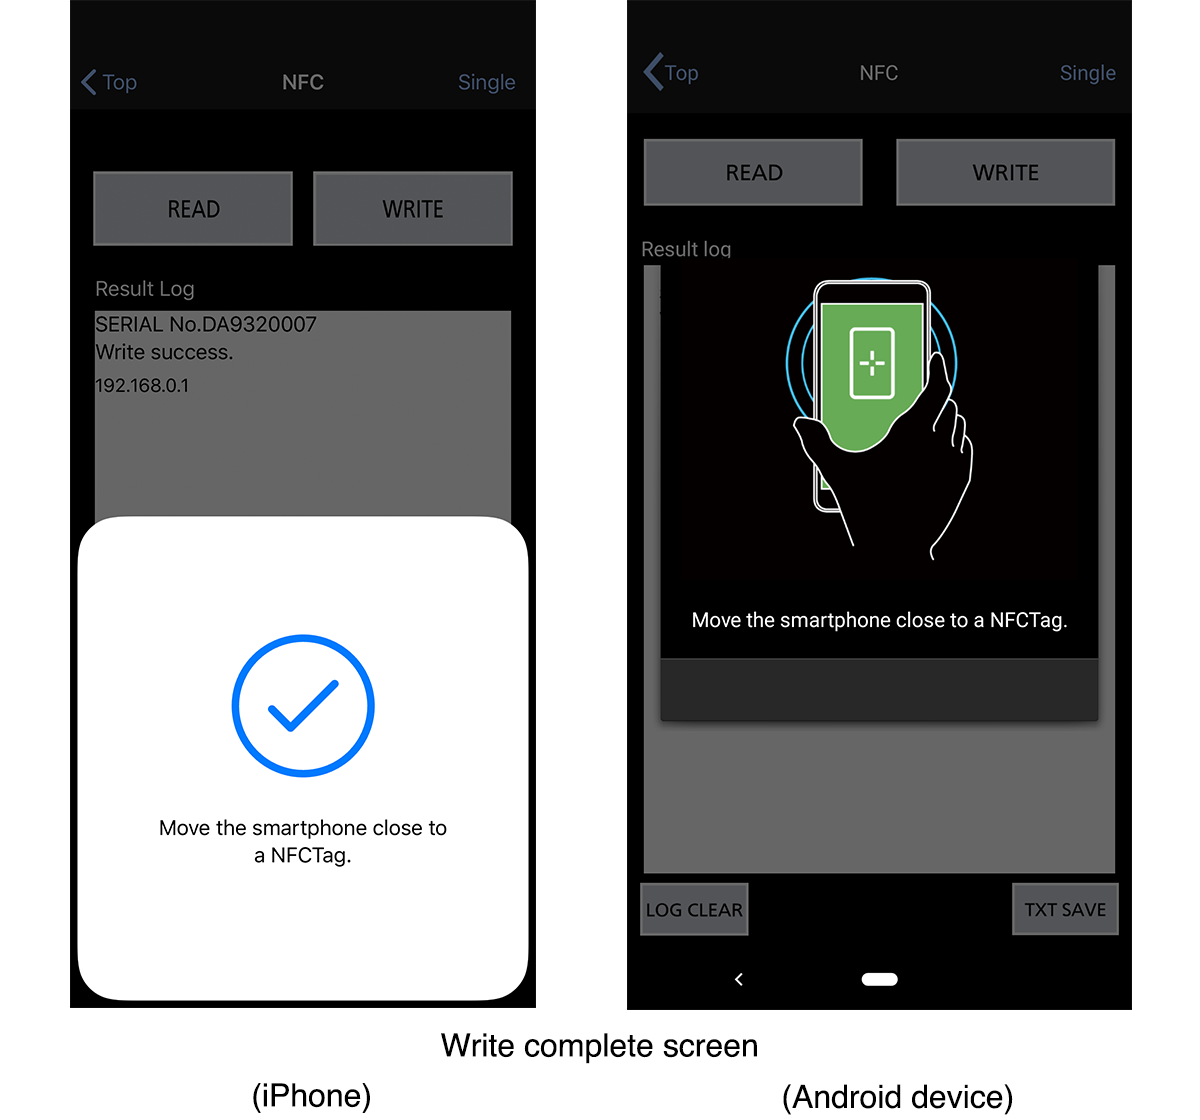
5) Move the device close to the NFC touch point of the projector unit while the write standby screen is displayed.
- ・When writing succeeds, all items are displayed in gray.
- ・If writing fails, a message appears to notify you that writing failed. If writing failed, tap the [WRITE] button to perform writing again.
- ・The written setting values are reflected when the projector’s power is turned on next time.
- ・To continue writing, tap the [READ] button to perform reading and then tap the [WRITE] button. (Writing is not possible if the projector setting information has not been read.)
■ When writing the projector setting information continuously for multiple projector units
Tap the [NFC] button in the [Top] screen. The [NFC] screen appears.
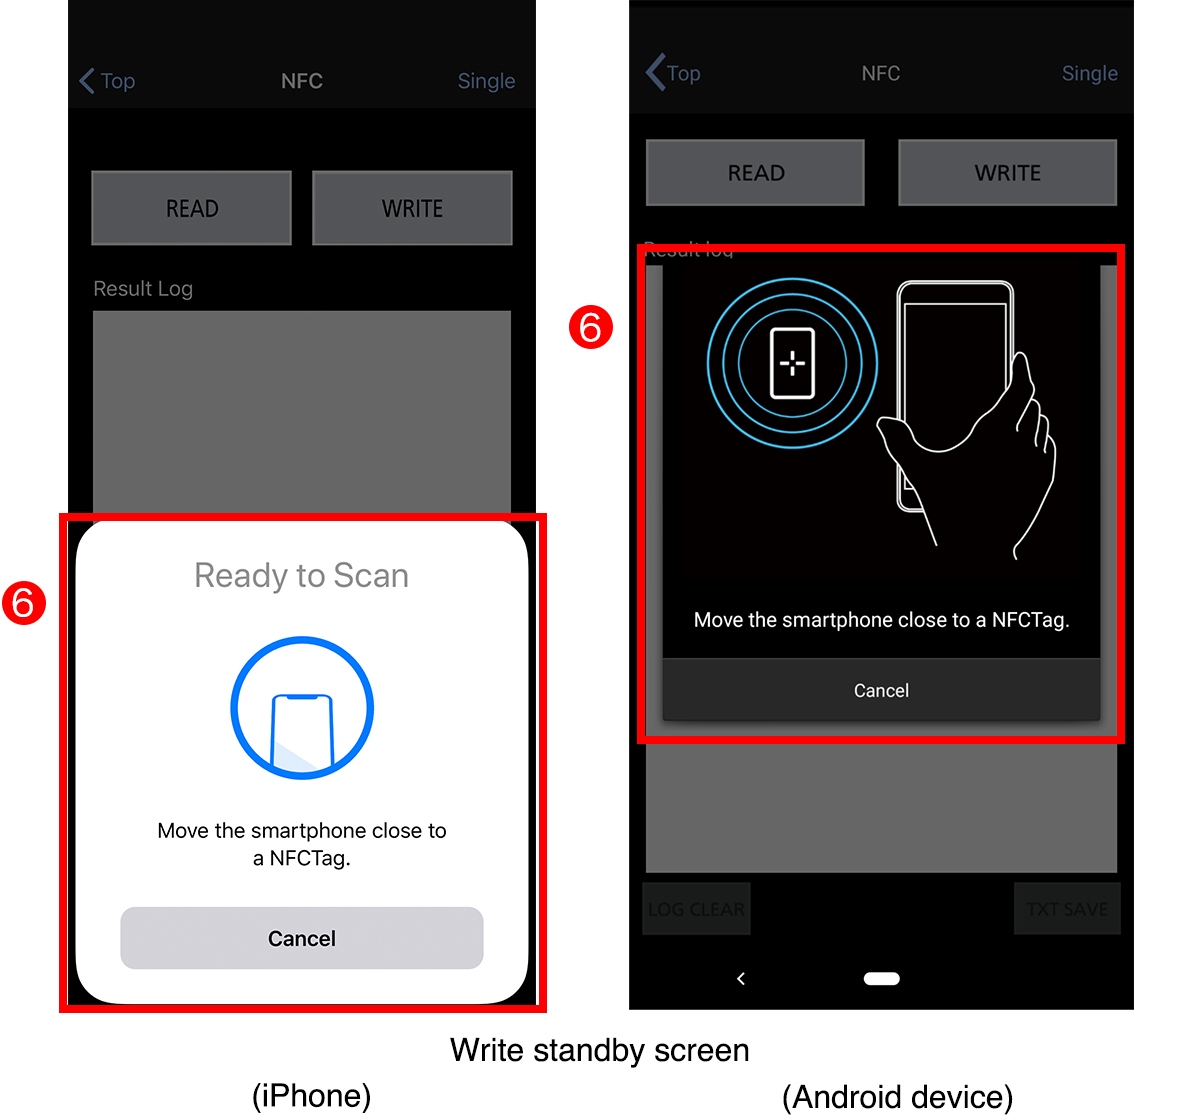
![Write standby screen (iPhone)/(Android device), [NFC] screen for single reading, [NFC] screen for continuous writing](img/img_nfc03_09_pc.png)
![[WRITE SETTING] screen, [NFC] screen, Write standby screen (iPhone)/(Android device)](img/img_nfc03_10_pc.png)
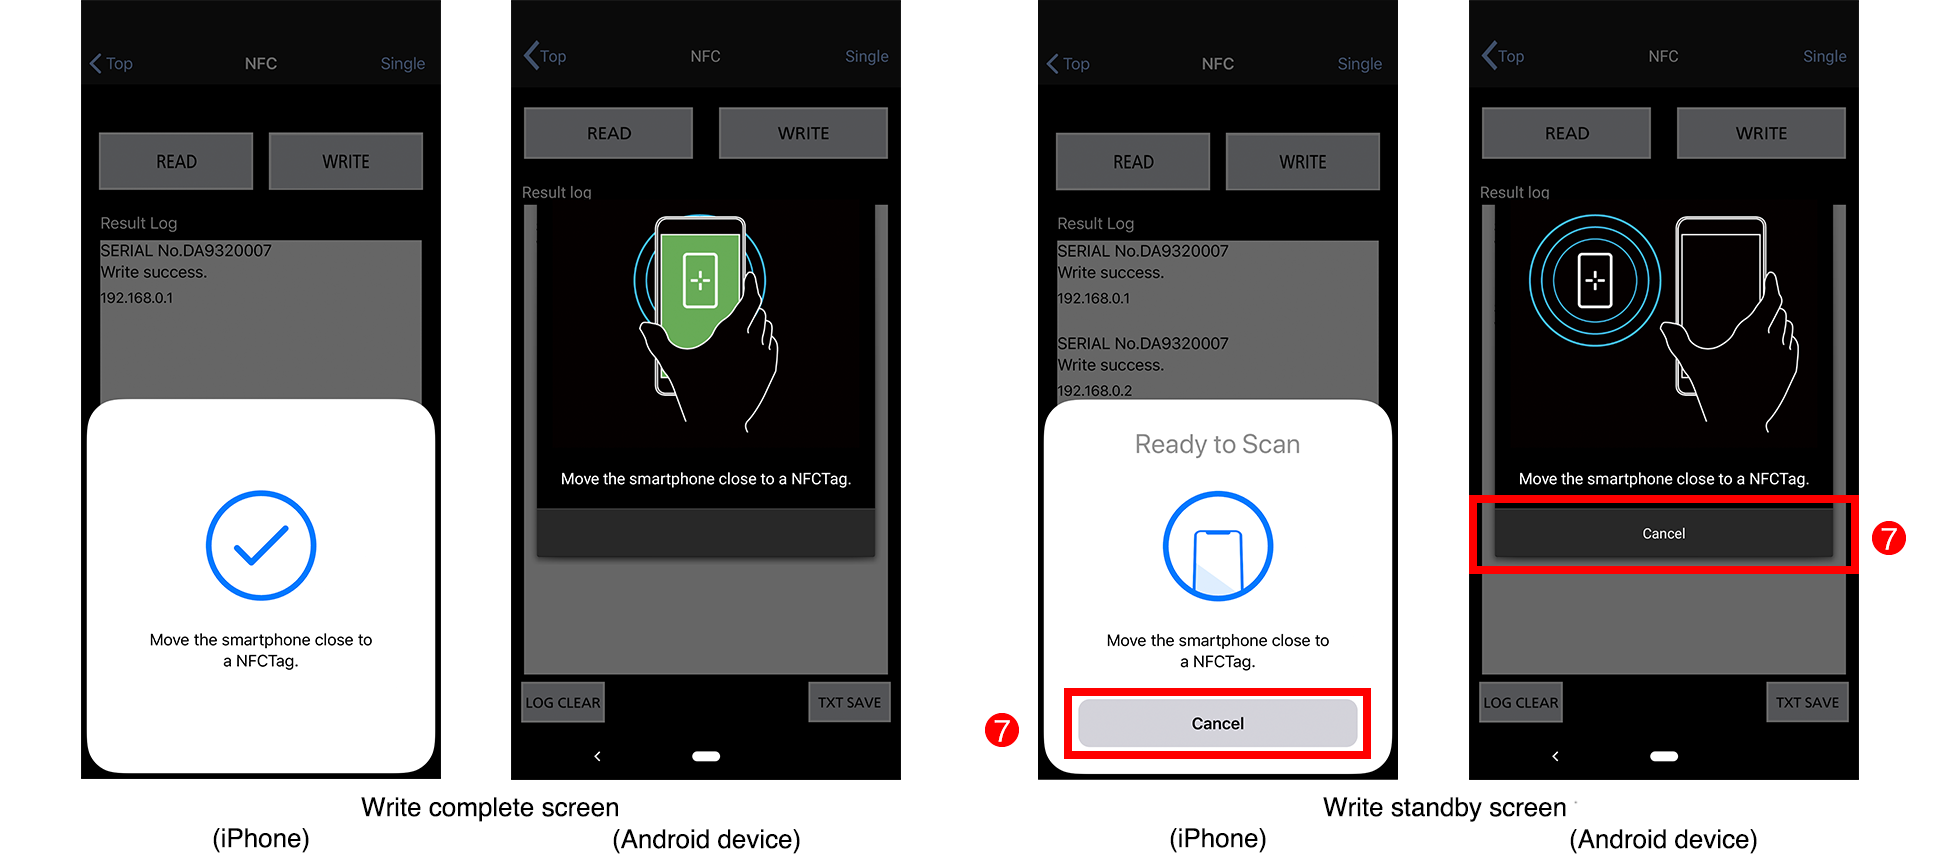
![[NFC] screen after continuous writing](img/img_nfc03_12_pc.png)
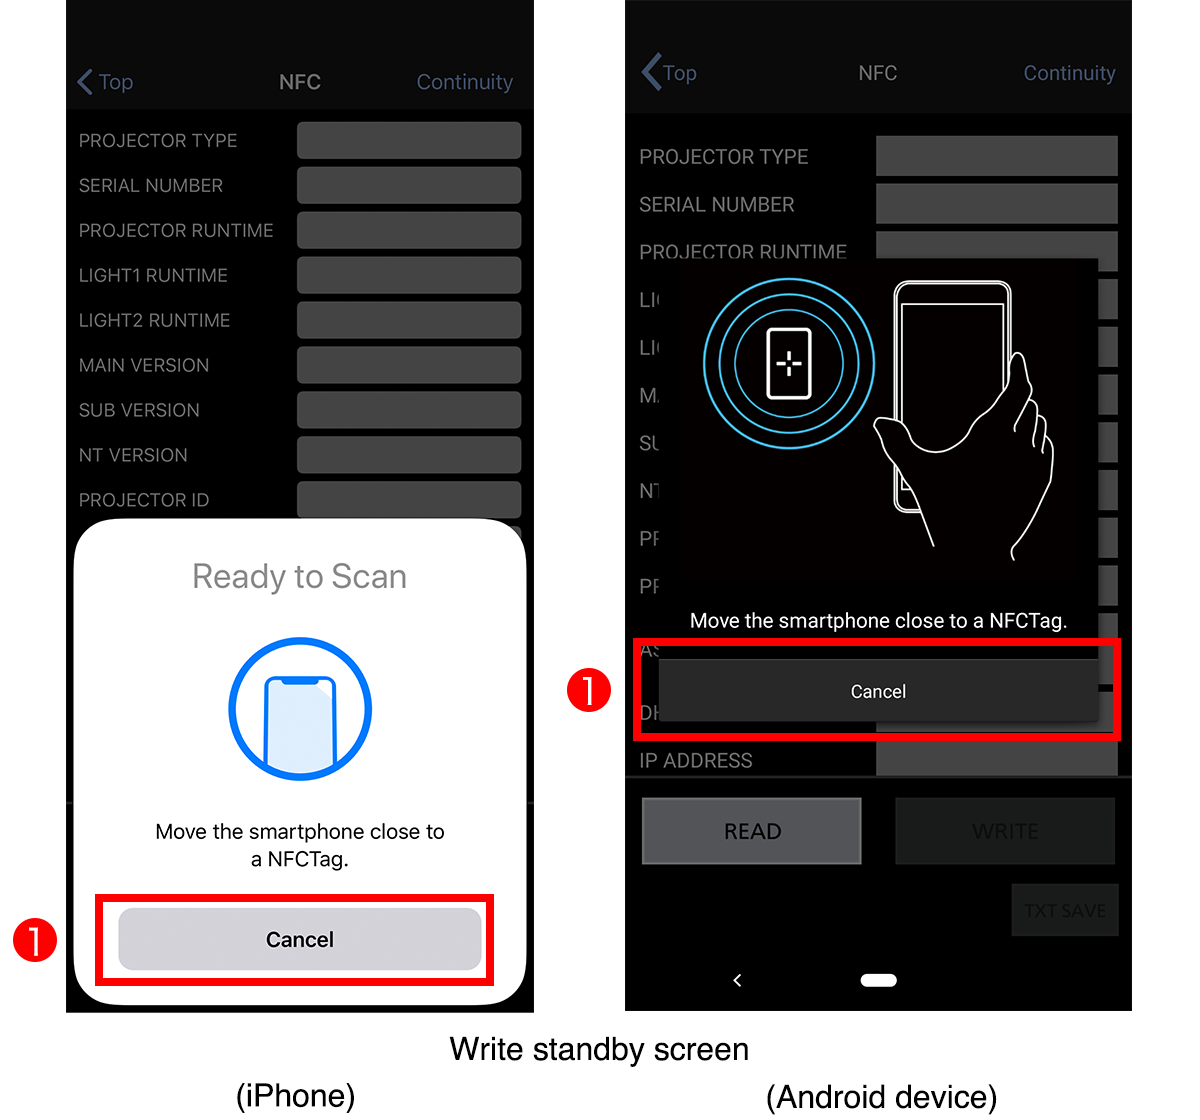
![[NFC] screen, [NFC] screen for continuous writing](img/img_nfc03_09b.png)
![[WRITE SETTING] screen](img/img_nfc03_10a.png)
![[NFC] screen after continuous writing](img/img_nfc03_12a.png)
1) Tap [Cancel].
- ・The [NFC] screen appears.
2) Tap [Continuity].
- ・The [NFC] screen for writing appears.
3) Tap the [WRITE] button.
- ・The [WRITE SETTING] screen appears.
- ・If you tap [Single] on the [NFC] screen for continuous writing, the display switches to the [NFC] screen for single writing.
4) Select or enter [TYPE], [INITIAL VALUE], [CHANGE MODE], [USER NAME], and [PASSWORD].
- ・When you change the projector setting information, the [WRITE] button is enabled.
If you check [Remember me], [User Name] and [Password] will be entered automatically from next time.
Writable Projector Setting Information
- TYPE
- Select [IP ADDRESS] or [PROJECTOR ID].
- INITIAL VALUE
- Enter the value for the item selected in TYPE.
- IP ADDRESS
- …If a DHCP server will not be used, enter the IP address (IPv4).
(Allowed characters: Up to 15 single-byte alphanumeric characters, symbols, and periods (.)) - PROJECTOR ID
- …Select from ALL or 1 to 64 for the projector ID.
- CHANGE MODE
- Same value
- …Select this when [TYPE] is set to [PROJECTOR ID]. This sets a projector ID that is common to the one entered in [INITIAL VALUE] for different projectors continuously.
Furthermore, if this is selected when [TYPE] is set to [IP ADDRESS] and [INITIAL VALUE] is set to a blank state in an environment that uses a DHCP server, it sets [INITIAL VALUE] of different projectors to a blank state continuously. - Increment
- …Select this when [TYPE] is set to [IP ADDRESS] in an environment that does not use a DHCP server. This sets the different projectors continuously while incrementing the number of the host part at the end of the IP address from that entered in [INITIAL VALUE].
Furthermore, if this is selected when [TYPE] is set to [PROJECTOR ID], it sets different projectors continuously while incrementing the projector ID from that entered in [INITIAL VALUE].
5) Tap the [WRITE] button.
- ・Write standby screen appears.
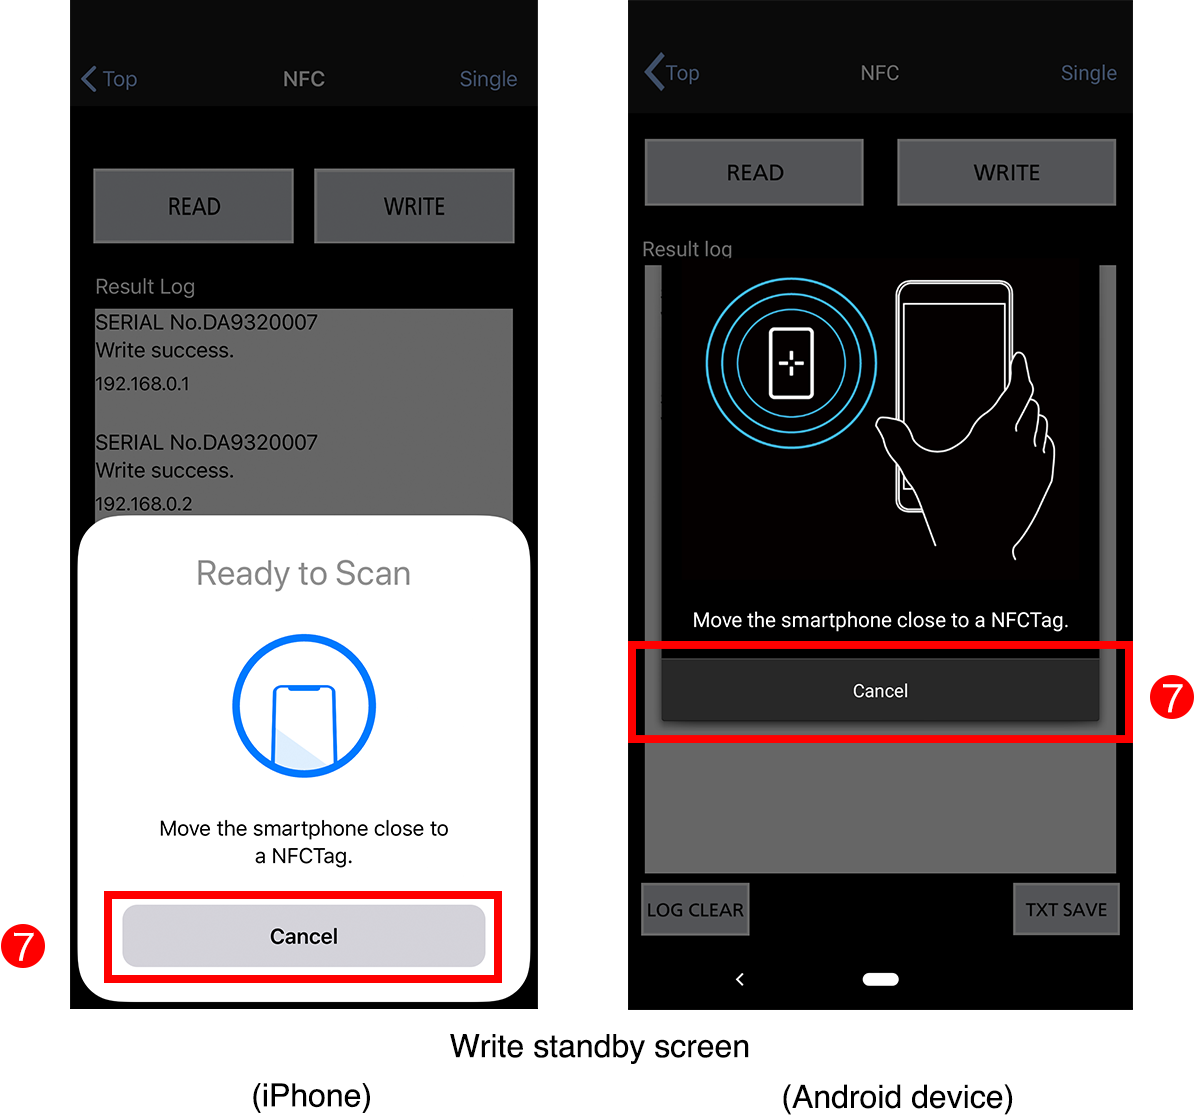
6) Move the device close to the NFC touch point of the projector unit while the write standby screen is displayed.
- ・After writing, the write standby screen appears automatically.
- ・If the administrator account for the projector is not set, a confirmation screen appears. Configure the settings of the administrator account for the projector and then move the device close to the NFC touch point of the projector unit. The setting method of the administrator account for the projector differs depending on the projector model.
- For the PT-RQ50K (firmware version 4.01 or above), PT-RQ45K Series, PT-RQ35K2 Series, PT-RQ35K Series (firmware version 1.01 or above), PT-RQ25K Series, PT-RZ14K, PT-REQ15 Series, PT-REZ15 Series, and PT-MZ20K Series
The administrator account setting screen appears. Enter the administrator account user name and password you want to set in [User Name] and [Password], tap the [OK] button, then configure the settings for the administrator account of the projector.- For the PT-RQ50K (firmware version lower than 4.01), PT-RQ35K Series (firmware version lower than 1.01), PT-RCQ10 Series, and PT-MZ16K Series
The administrator account cannot be set in this application software. Configure the settings of the administrator account on the projector unit. - ・If you successively move the device close to the NFC touch point of another projector unit, you can write the projector setting information continuously.
7) To finish writing, tap [Cancel] displayed on the write standby screen.
- ・On the [NFC] screen after continuous writing, the writing results appear as [SERIAL NUMBER] for the projector you wrote.
- ・When writing succeeds, [Write success] appears.
- ・If writing fails, [Failed to write] appears. In this case, tap the [WRITE] button to perform writing again.
- ・The written setting values are reflected when the projector’s power is turned on next time.
- ・To continue writing, tap the [WRITE] button.
Notice
- The points to note when setting the password of an administrator account are as follows.
- Reusing passwords is not recommended.
- Password cannot be blank.
- A password consisting of at least eight half-width characters and containing characters of at least three of the following four types is recommended.
- ・Uppercase letters
- ・Lowercase letters
- ・Digits
- ・Symbols (~!@#$%^&*()_+\|}{][<>.,/?')
- Do not move the device away from the NFC touch point of the projector unit until the write complete message appears.
- To save the writing result log and written projector setting information to the device in text format, tap the [TXT SAVE] button.
With iPhone, the data is saved to the Files application.
With an Android device, the data is saved to the internal storage. For the save location in the internal storage, check the message displayed when reading succeeds. - To delete [Writing results] displayed on the [NFC] screen after writing completes, tap the [LOG CLEAR] button. (Only when writing the projector setting information continuously for multiple projector units)
- If a DHCP server is used, those settings cannot be written continuously to multiple projectors using this application software. Configure the projectors one unit at a time.
