


Register the Projector
Basic flow
1. Start up Smart Projector Control
2. Register the projector
Launching of application software
Tap the Smart Projector Control icon to launch the application software.
Top screen
When Smart Projector Control starts up, the [Top] screen appears.
Tap the [USB CONNECT CONTROL], [NFC], [REGISTRATION], [CONTROL] or [SETUP] button to perform the intended operation.
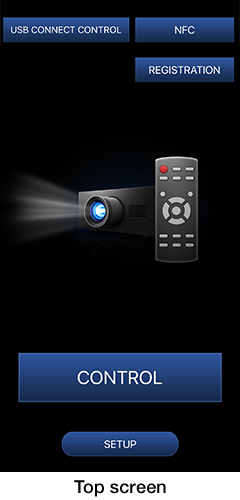

- The projector's Web control screen appears.
The Web Control screen allows you to set and adjust the projector and check the projector information from the device.
For details on how to use USB CONNECT CONTROL, please refer to Using the USB Connect Control Function. 
- Displays the screen for using the NFC function.
The projector setting information can be read and written by using the NFC function.- For a device not compatible with the NFC function, the [NFC] button will be grayed out and cannot be tapped.

- Displays the projector search screen.
You can register a new projector to be operated from the smartphone or edit the registered projector information. 
- Displays the projector selection screen.
You can operate the registered projector.
For details on how to use CONTROL, please refer to Select and Operate the Projector. 
- Displays the settings screen.
You can set the projector's Auto Registration function or the device’s sound and vibration.
For details on how to use SETUP, please refer to Select and Operate the Projector.
Registration of projector
The projector you want to operate using Smart Projector Control must be registered in advance.
A projector can be registered using one of the following two methods.
・When using the network search function
Search for projectors on the same network as the smartphone, and select the projector to operate and then register it.
・When specifying the IP address
Select a projector on the same network as the smartphone by specifying its IP address, and then register it.
Notice
- Up to 64 projectors can be registered.
- If you change the user name and password used for the projector's Web Control function after registering the projector, communication will no longer be possible. In such cases, you must register the projector again.
When using the network search function
Tap the [REGISTRATION] button on the [Top] screen to display the [Registration] screen (projector search screen).
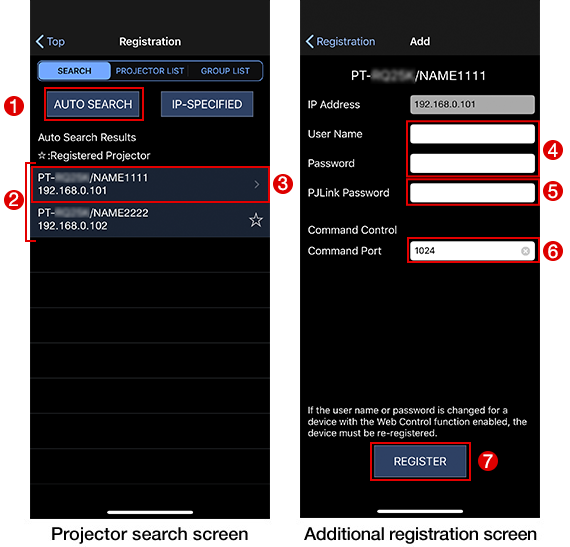
1) Tap the [AUTO SEARCH] button.
- The search results (projector type, projector name, IP address) are displayed in the [Auto Search Results] section.
2) Completion of search
- Registered projectors are indicated with a
 mark on their right side in the search results.
3) Tap the projector you want to register.
- The [Add] screen (additional registration screen) appears.
4) Enter the user name and password in [User Name] and [Password].
- Enter the user name and password with administrator authority or administrator account set in the projector to be registered.
5) Enter the PJLink password in [PJLink Password].
- Enter the password for PJLink set in the projector to be registered.
- [PJLink Password] may be grayed out depending on your projector. In this case, the PJLink password cannot be entered.
- The password used for PJLink may be same as the one set in Web Control, or set individually as "PJLink Password" depending on the projector model. Regarding the PJLink security authentication, please check your projector Operating Instructions.
6) Enter the command port no. in [Command Port].
- Enter the command port no. (port no. of port used for command control) set in the projector to be registered.
7) Tap the [REGISTER] button.
- When the registration of the projector is completed, a confirmation message appears. Tap the [OK] button,
The projector search screen appears.
Notice
- Enabling the auto registration function of the application software eliminates the need to enter the user name, password and command port no. when you register a projector selected from the network search results. For setting details, refer to Settings of Auto Registration Setup.
When specifying the IP address
Tap the [REGISTRATION] button on the [Top] screen to display the [Registration] screen (projector search screen).
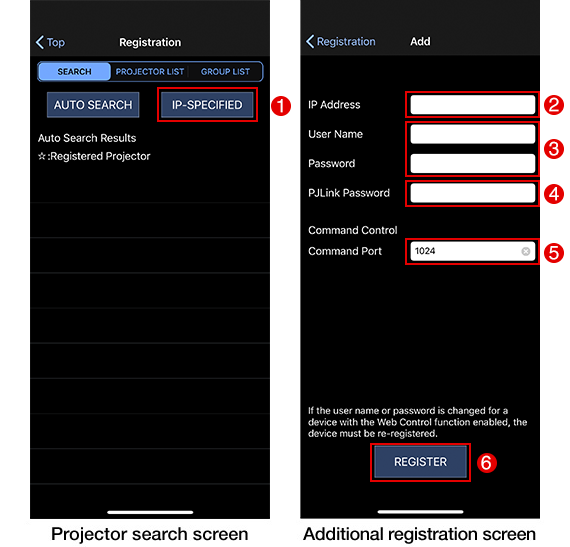
1) Tap the [IP-SPECIFIED] button.
- The [Add] screen (additional registration screen) appears.
2) Enter the IP address in [IP Address].
- Enter the IP address set in the projector to be registered.
3) Enter the user name and password in [User Name] and [Password].
- Enter the user name and password with administrator authority or administrator account set in the projector to be registered.
4) Enter the PJLink password in [PJLink Password].
- Enter the password for PJLink set in the projector to be registered.
- The password used for PJLink may be same as the one set in Web Control, or set individually as "PJLink Password" depending on the projector model. Regarding the PJLink security authentication, please check your projector Operating Instructions.
5) Enter the command port no. in [Command Port].
- Enter the command port no. (port no. of port used for command control) set in the projector to be registered.
6) Tap the [REGISTER] button.
- When the registration of the projector is completed, a confirmation message appears. Tap the [OK] button,
The projector search screen appears.
Editing of registered projector information
Registered projector information such as the IP address can be changed.
Tap the [REGISTRATION] button in the [Top] screen to display the [Registration] screen (projector search screen).
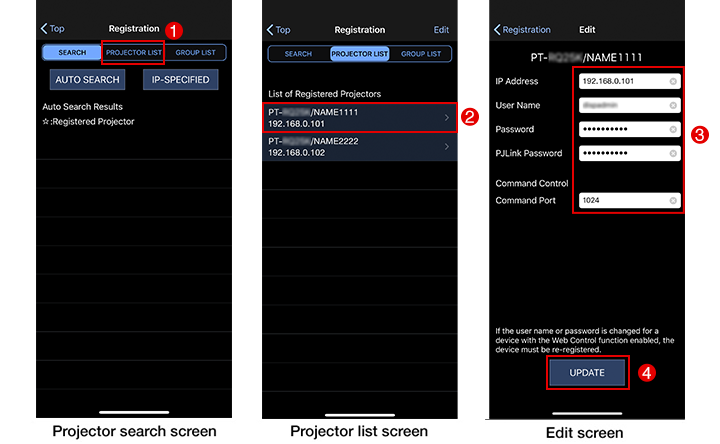
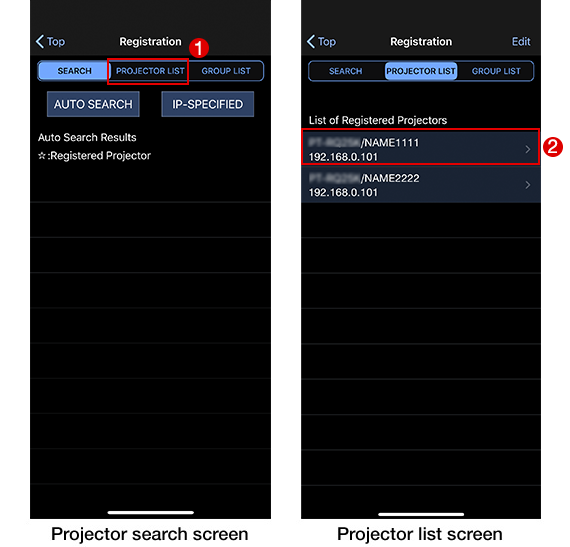
1) Tap the [PROJECTOR LIST] button.
- A list of registered projectors appears.
2) Tap the name of the projector for which you want to edit the registered information.
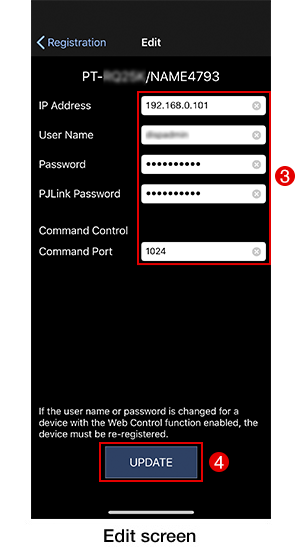
- The [Edit] screen appears.
3) Change the set data as needed.
- Change the registered information in [IP Address], [User Name], [Password], [PJLink Password] and/or [Command Port] as needed.
4) Tap the [UPDATE] button.
- The registered information is updated, and then a list of registered projectors appears.
Deletion of projector
A selected projector can be deleted from the list of registered projectors.
Tap the [REGISTRATION] button in the [Top] screen to display the [Registration] screen (projector search screen).
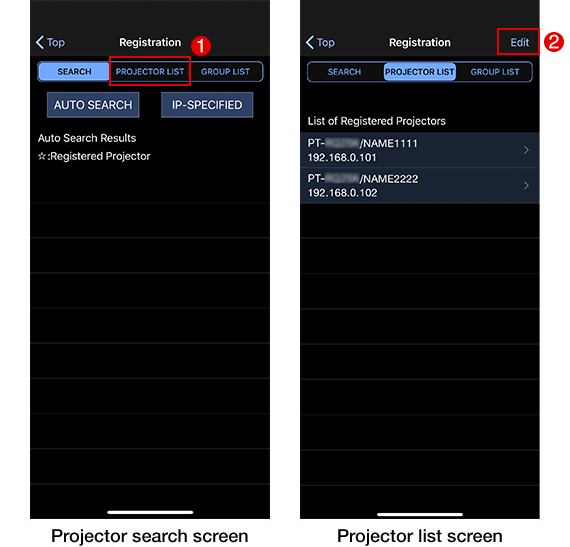
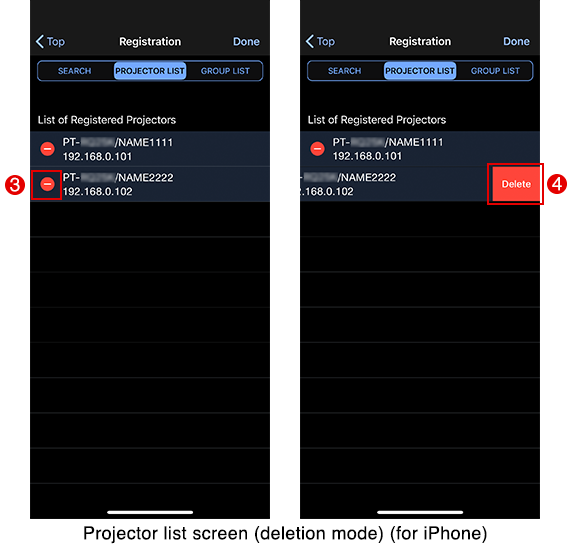
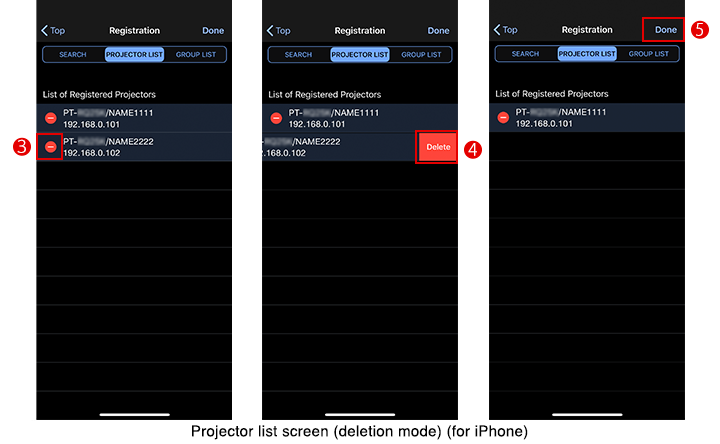
1) Tap the [PROJECTOR LIST] button.
- A list of registered projectors appears.
2) Tap [Edit].
- The projector edit screen appears.
- A "
 " mark ([DELETE] button with an Android device) appears on the left side of each registered projector.
3) Tap " " ([DELETE] button with an Android device) for the projector you want to delete.
For iPhone
- A [Delete] button appears on the right side of the selected projector name.
- To undo the selection of the projector to delete, tap another location other than " " on the screen.
For Android devices
- The deletion confirmation screen is displayed.
4) Tap the [Delete] button ([OK] button on the deletion confirmation screen with an Android device).
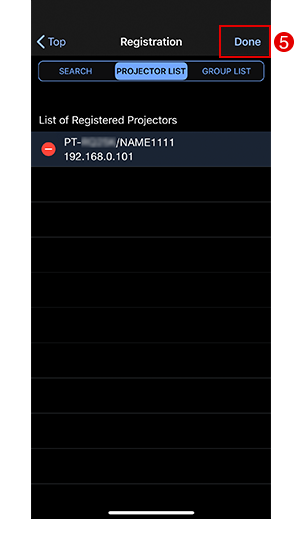
- The selected projector is deleted.
5) Tap [Done].
- The Delete mode is cancelled.
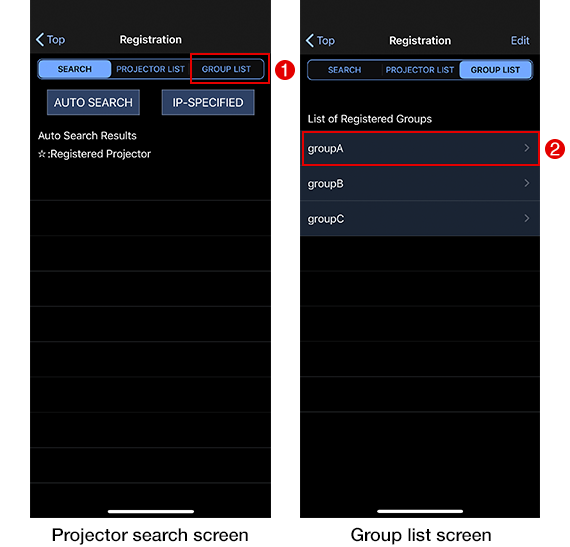
Registration of group
You can register multiple projectors as one group. Registering a group allows you to select multiple projectors together.
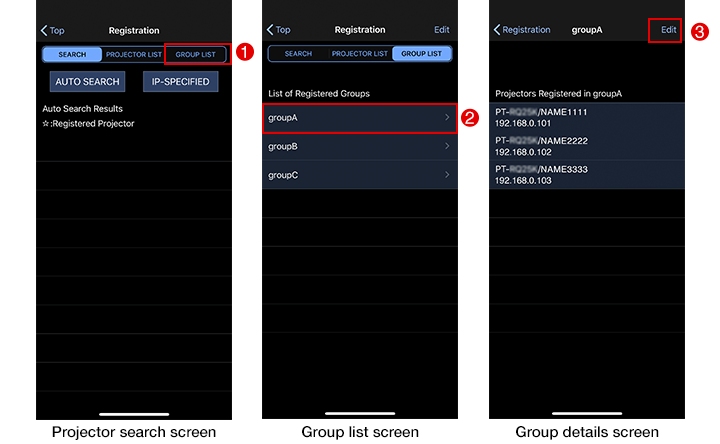
Tap the [REGISTRATION] button on the [Top] screen to display the [Registration] screen (projector search screen).
A group can be registered using one of the following two methods.
・Selecting from registered projectors
Select the projectors to register as a group from the list of registered projectors.
・Importing a file
Register a group by importing a file (dat file) exported for this application software by Multi Monitoring and Control Software.
Selecting from registered projectors

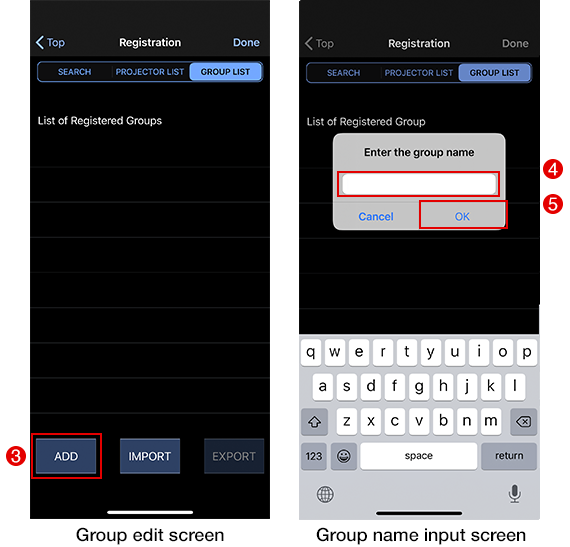


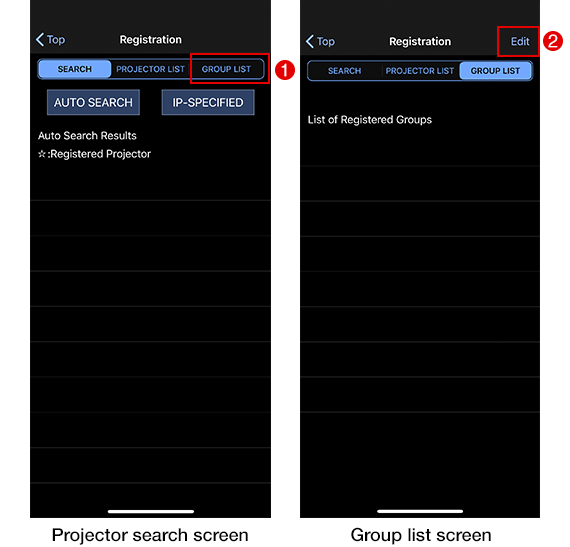
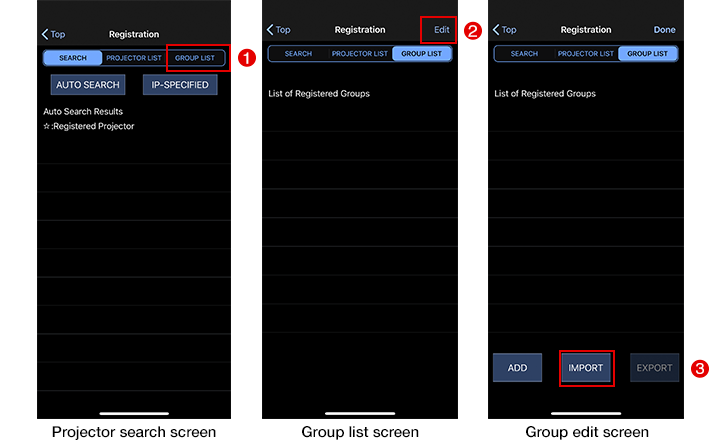
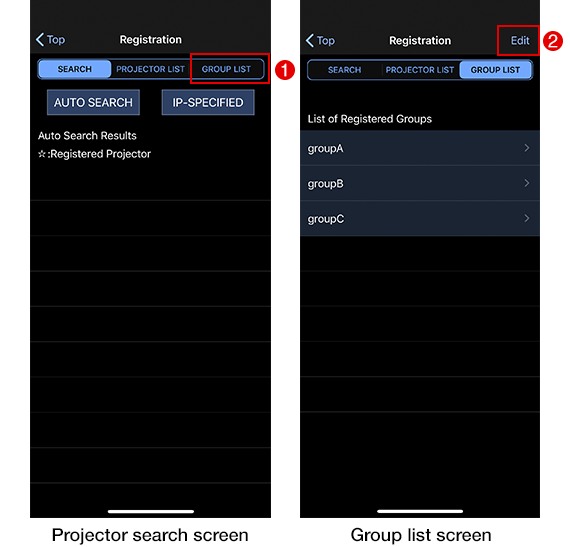
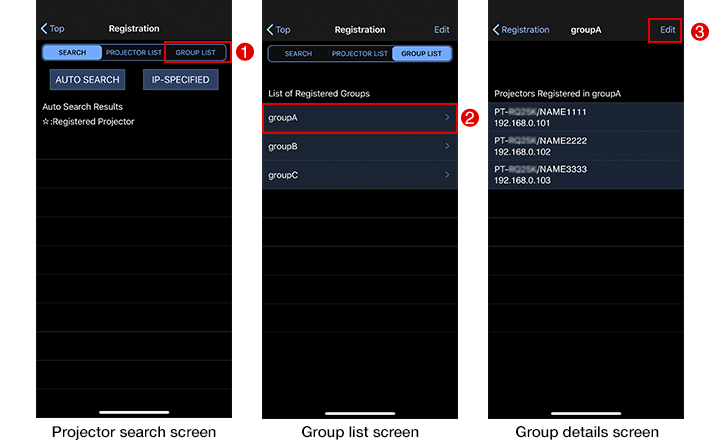
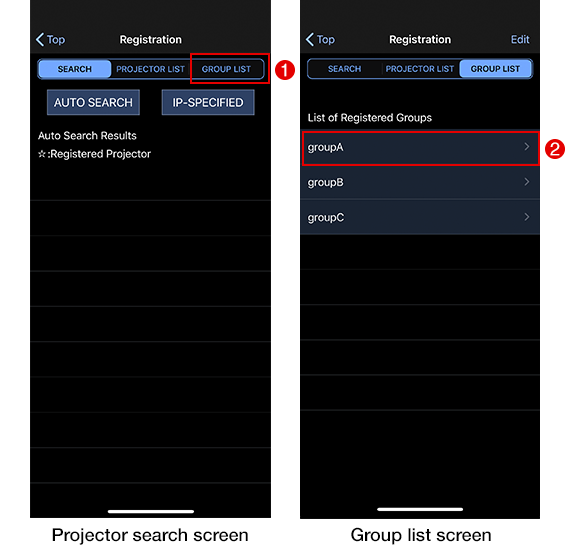
1) Tap the [GROUP LIST] button.
- The group list screen appears.
2) Tap [Edit].
- The group edit screen appears.
3) Tap the [ADD] button.
- The group name input screen appears.
4) Enter a group name.
- (Allowed characters: up to 32 double-byte characters or 64 single-byte characters)
5) Tap the [OK] button.
- The entered group name is displayed in the group edit screen.
- There is no limit to the number of groups that can be registered.
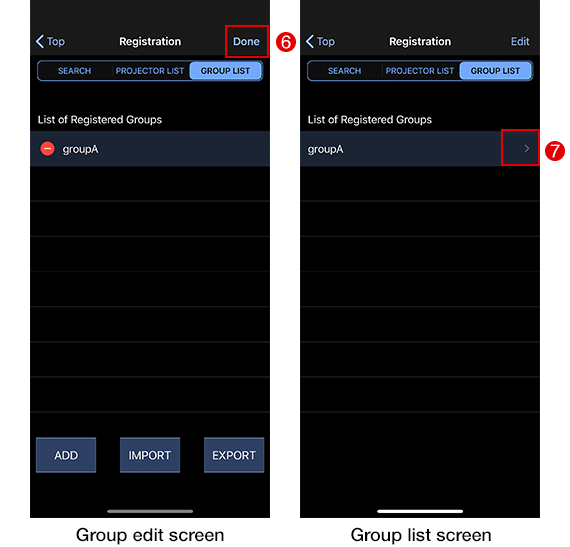
6) Tap [Done].
- The group list screen appears.
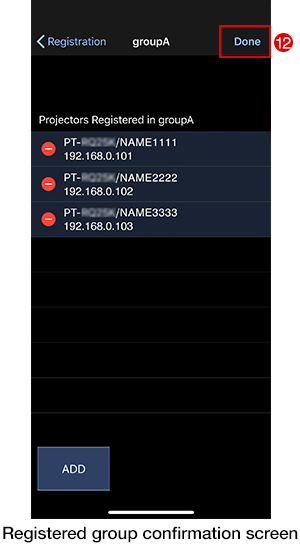
7) Tap the created group.
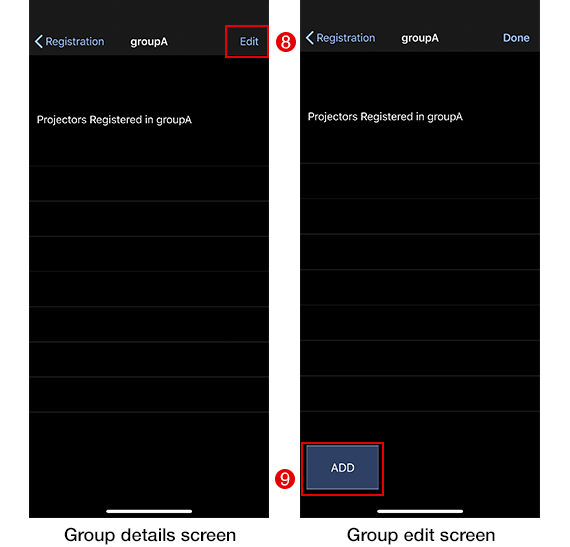
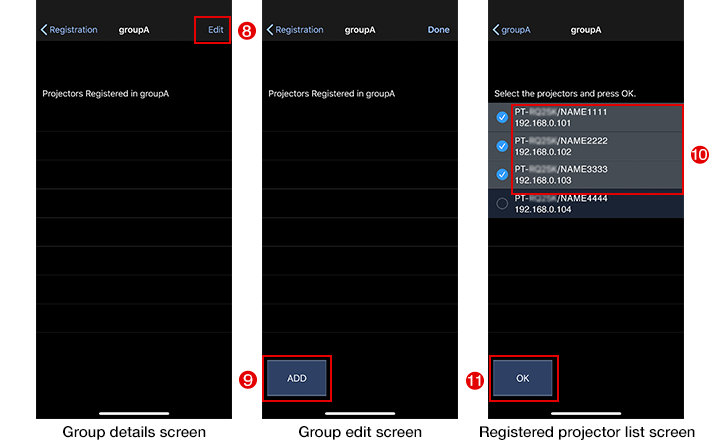
- The group details screen appears.
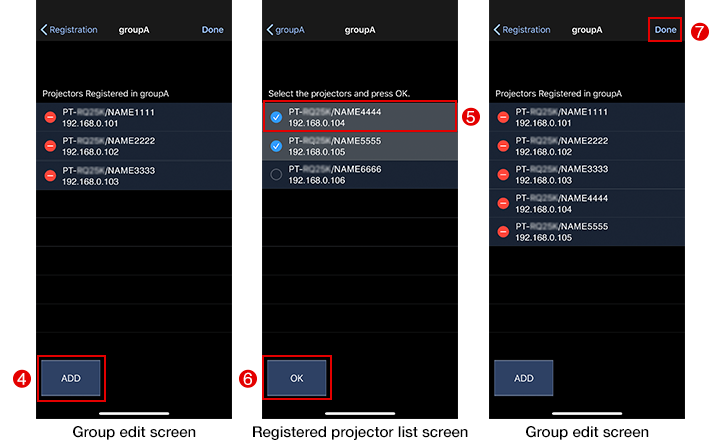
8) Tap [Edit].
- The group edit screen appears.
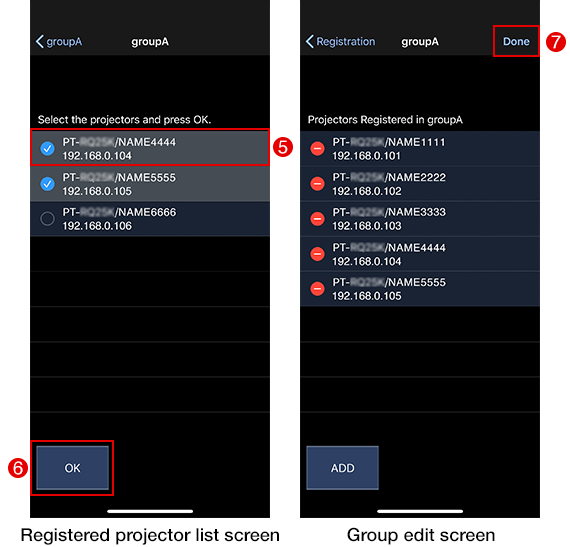
9) Tap the [ADD] button.
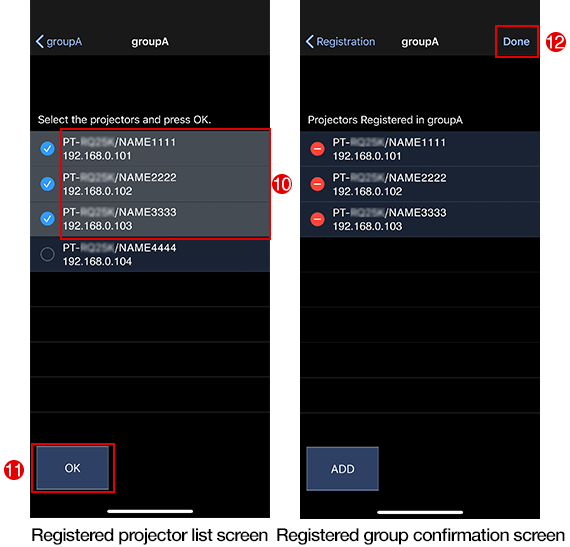
- The registered projector list screen appears.
10) Tap the projector you want to register (multiple selectable).
11) Tap the [OK] button.
- Registration of the group is completed.
12) Tap [Done].
- The group list screen is redisplayed.
Notice
- A registered group name cannot be edited later. If you want to change a group name, perform registration again by deleting the target group name and registering a new group name.
Importing a file
・A file (dat file) for this application software must be exported by Multi Monitoring and Control Software in advance.
・If you import a file, the currently registered projectors and groups will be exported as a backup file (dat file) and then all deleted. If you want to restore them, import the backup file. The name and save location of a backup file created with Multi Monitoring and Control Software are as follows.
File name
・Name of file exported from Multi Monitoring and Control Software:
MMCS_DeviceList_XXXXXXXXXXXXXX.dat
("XXXXXXXXXXXXXX" consists of the year, month, day, hour, minute, and second)・Name of the backup file of this application software:
backup_XXXXXXXXXXXXXX.dat
("XXXXXXXXXXXXXX" consists of the month, day, year, hour, minute, and second)
Save location
・With iPhone, the data is saved to the Files application.
・With an Android device, the data is saved to the following path of the internal storage.
(This may differ depending on the device.)
Internal storage\
Android\data\com.panasonic.controlpj\file
1) Tap the [GROUP LIST] button.
- The group list screen appears.
2) Tap [Edit].
- The group edit screen appears.
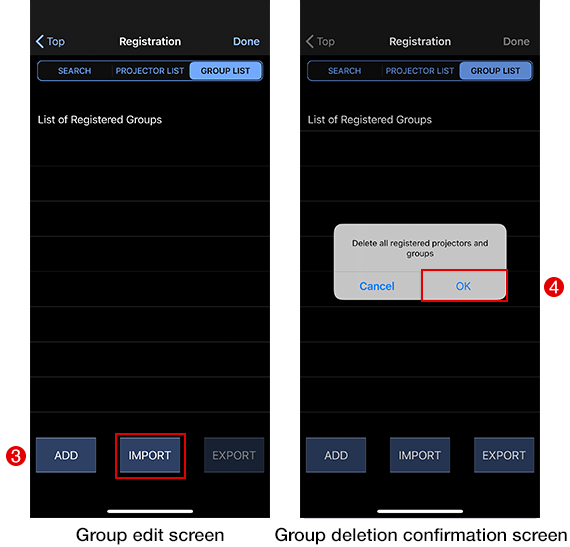
3) Tap the [IMPORT] button.
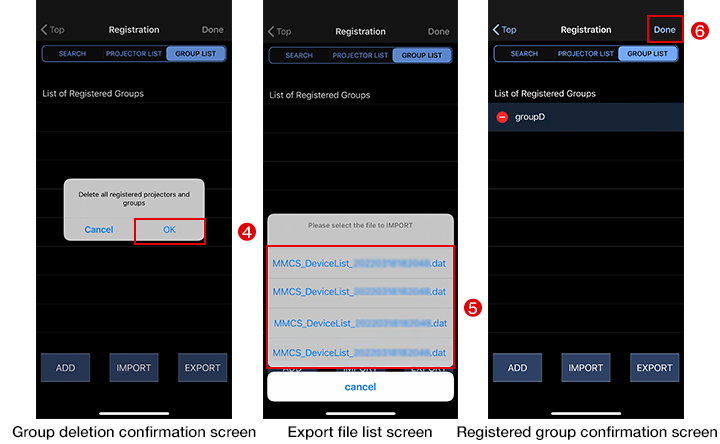
- The registered projector and group deletion confirmation screen appears.
4) Tap the [OK] button.
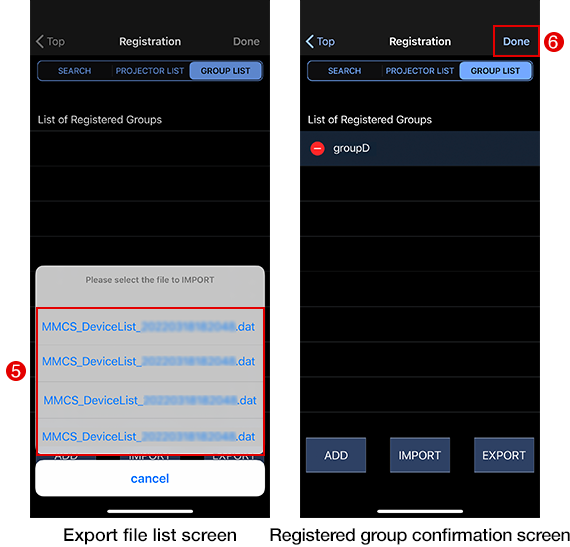
- A list of files exported by Multi Monitoring and Control Software appears.
File name: MMCS_DeviceList_XXXXXXXXXXXXXX.dat
("XXXXXXXXXXXXXX" consists of the year, month, day, hour, minute, and second)
5) Tap the file to be imported.
- The groups and projectors are registered.
6) Tap [Done].
- The group list screen is redisplayed.
Deletion of group
You can delete a registered group.
Tap the [REGISTRATION] button on the [Top] screen to display the [Registration] screen (projector search screen).
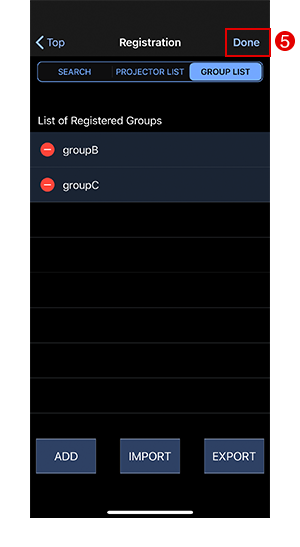
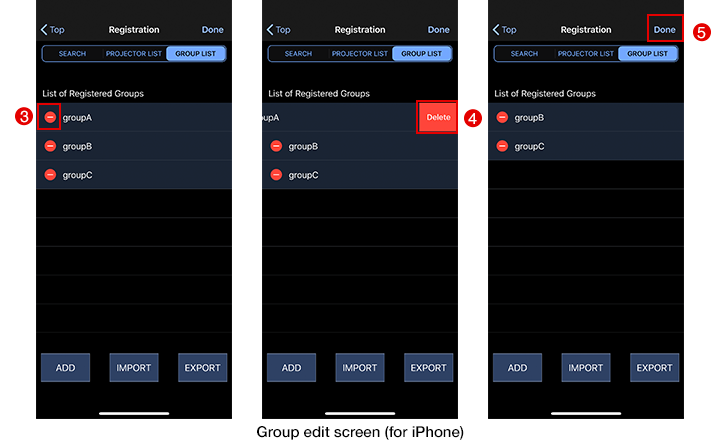
1) Tap the [GROUP LIST] button.
- A list of registered groups appears.
2) Tap [Edit].
- The group edit screen appears.
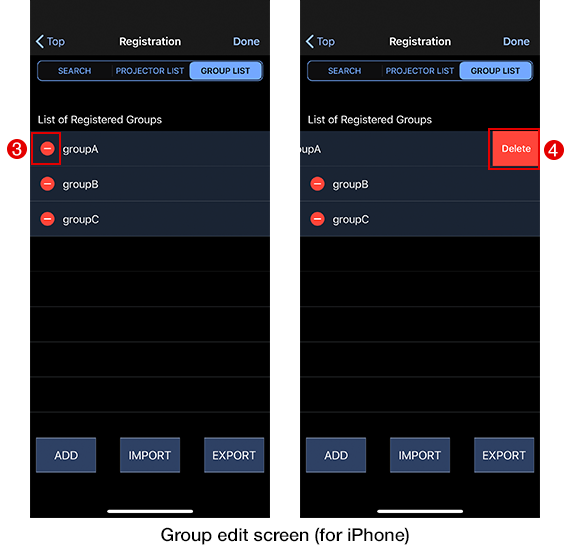
- A "" mark ([DELETE] button with an Android device) appears on the left side of each registered group.
3) Tap "" ([DELETE] button with an Android device) for the group you want to delete.
For iPhone
- A [Delete] button appears on the right side of the selected group name.
- To undo the selection of the group to delete, tap another location other than the [Delete] button on the screen.
For Android devices
- The deletion confirmation screen appears.
4) Tap the [Delete] button ([OK] button on the deletion confirmation screen with an Android device).
- Deletion of the selected group is completed.
5) Tap [Done].
- The group list screen is redisplayed.
Editing of group
You can add a new projector to a registered group, or delete a projector registered to a group.
Tap the [REGISTRATION] button on the [Top] screen to display the [Registration] screen (projector search screen).
Adding a projector to a registered group
1) Tap the [GROUP LIST] button.
- The group list screen appears.
2) Tap the target group name.
- The group details screen appears.
3) Tap [Edit].
- The group edit screen appears.
4) Tap the [ADD] button.
- The registered projector list screen appears.
5) Tap the projector you want to add (multiple selectable).
6) Tap the [OK] button.
- The projector is added to the group.
7) Tap [Done].
- The group list screen is redisplayed.
Deleting a projector from a registered group

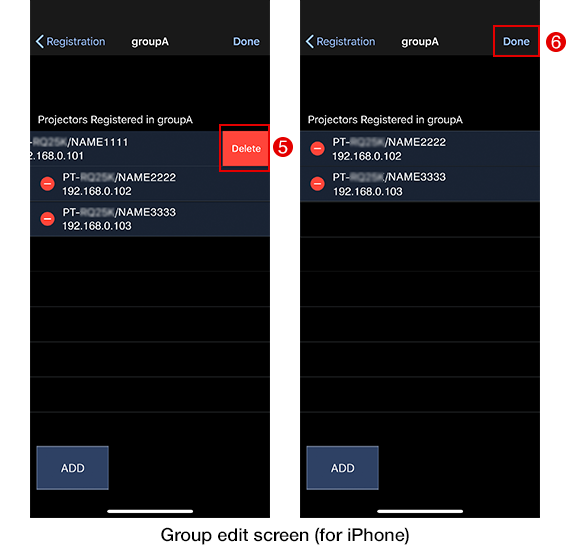
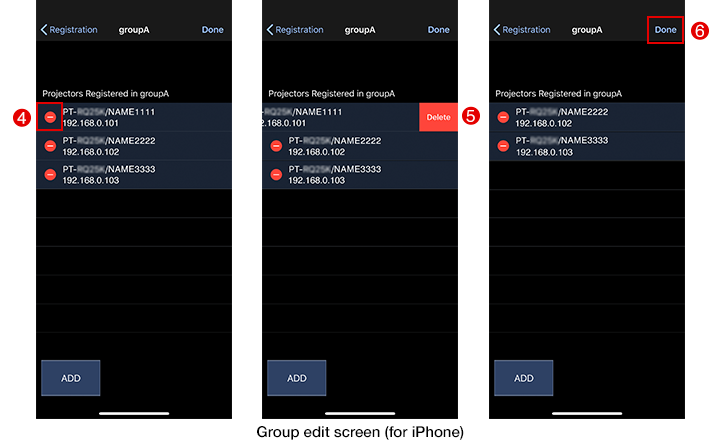
1) Tap the [GROUP LIST] button.
- The group list screen appears.
2) Tap the target group name.
- The group details screen appears.
3) Tap [Edit].
- The group edit screen appears.
- A "" mark ([DELETE] button with an Android device) appears on the left side of each registered projector.
4) Tap "" ([DELETE] button with an Android device) for the group you want to delete.
For iPhone
- A [Delete] button appears on the right side of the selected group name.
- To undo the selection of the group to delete, tap another location other than the [Delete] button on the screen.
For Android devices
- The deletion confirmation screen appears.
5) Tap the [Delete] button ([OK] button on the deletion confirmation screen with an Android device).
- Deletion of the selected group is completed.
6) Tap [Done].
- The group list screen is redisplayed.
Notice
- A registered group name cannot be edited later. If you want to change a group name, perform registration again by deleting the target group name and registering a new group name.
Exporting of registered group information
You can export the information of the registered groups and the setting information of the projectors belonging to each group to a device as a backup file (dat file).
Tap the [REGISTRATION] button on the [Top] screen to display the [Registration] screen (projector search screen).

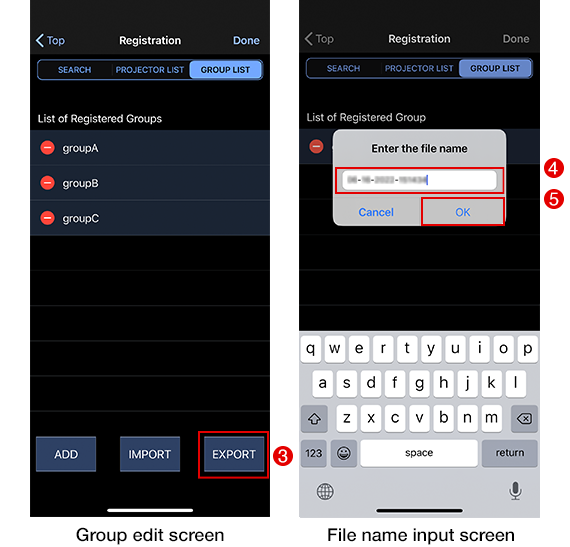
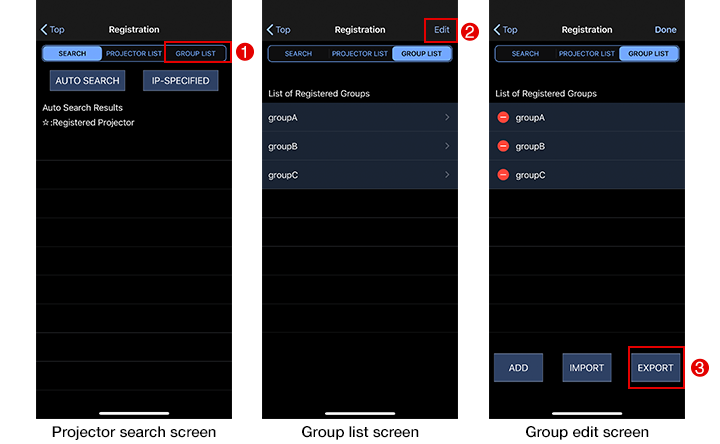
1) Tap the [GROUP LIST] button.
- The group list screen appears.
2) Tap [Edit].
- The group edit screen appears.
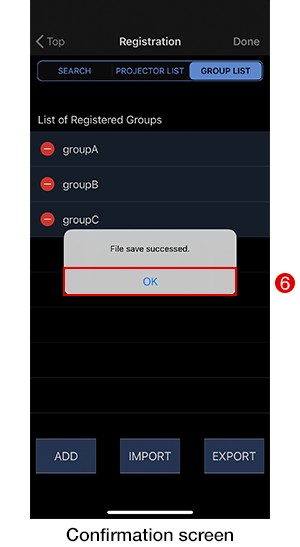
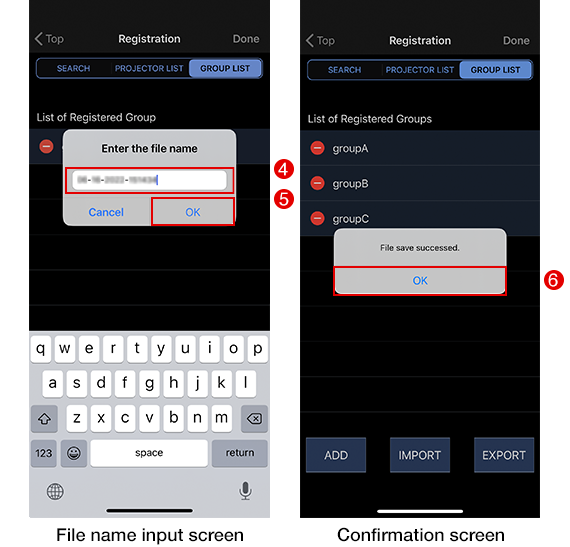
3) Tap the [EXPORT] button.
- The file name input screen appears.
4) Enter a file name.
- The date is input for the initial setting.
- The file name can be changed. (Allowed characters: single-byte numbers, single-byte alphabet letters, and single-byte symbols)
5) Tap the [OK] button.
- The confirmation screen appears.
6) Tap the [OK] button.
- With iPhone, the data is saved to the Files application.
- With an Android device, the data is saved to the internal storage. For the save location in the internal storage, check the message displayed after the confirmation screen.
- The group edit screen appears.
