


Select and Operate the Projector
Basic flow
1. Start up Smart Projector Control
2. Select the projector you want to operate
3. Operate the projector
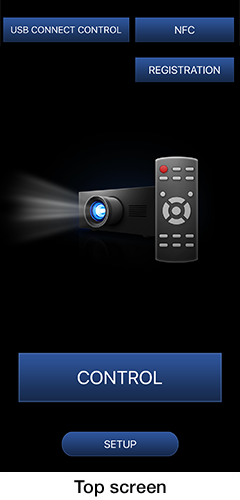
Launching of application software
Tap the Smart Projector Control icon to launch the application software.
Top screen
When Smart Projector Control starts up, the [Top] screen appears.
Tap the [USB CONNECT CONTROL], [NFC], [REGISTRATION], [CONTROL] or [SETUP] button to perform the intended operation.

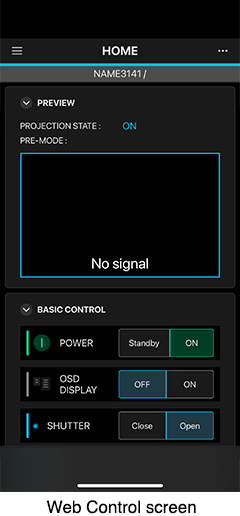
- The projector's Web control screen appears.
The Web Control screen allows you to set and adjust the projector and check the projector information from the device.
For details on how to use USB CONNECT CONTROL, please refer to Using the USB Connect Control Function. 
- Displays the screen for using the NFC function.
The projector setting information can be read and written by using the NFC function.- For a device not compatible with the NFC function, the [NFC] button will be grayed out and cannot be tapped.

- Displays the projector search screen.
You can register a new projector to be operated from the smartphone or edit the registered projector information.
For details on how to use REGISTRATION, please refer to Register the Projector. 
- Displays the projector selection screen.
You can operate the registered projector. 
- Displays the settings screen.
You can set the projector's Auto Registration function or the device’s sound and vibration.
Selection of projector
Select the projector you want to operate.
One of the following three methods can be used.

-
・When selecting one projector unit
You can select one projector from the registered projectors and operate it.

-
・When selecting multiple projector units
You can select multiple projectors from the registered projectors and operate them simultaneously.

-
・When selecting a group
You can select all projectors registered to a group and operate them.
When selecting one projector unit
Tap the [CONTROL] button in the [Top] screen to display the [Select] screen (projector selection screen).
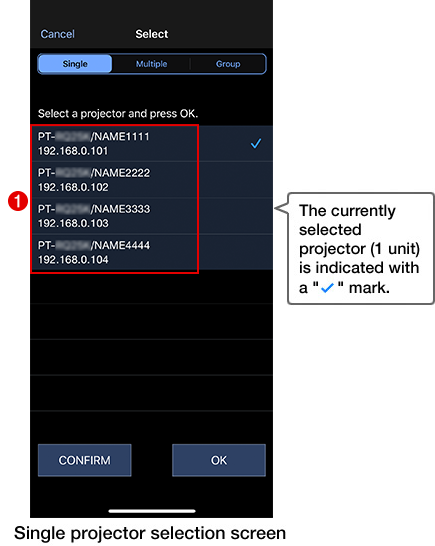
1) Tap the name of the projector you want to operate.
- The Control screen appears.
Notice
- Depending on the application software operating status, the previously displayed operation screen may appear, instead of the Control screen.
- For projectors with the [CONFIRM] button displayed, tapping the button allows you to confirm the corresponding projector.
Standby state: The power indicator of the corresponding projector flashes.
Projection state: The power indicator of the corresponding projector flashes, and the projector name is projected on the projector's on-screen menu.
When selecting multiple projector units
Tap the [CONTROL] button in the [Top] screen to display the [Select] screen (projector selection screen).
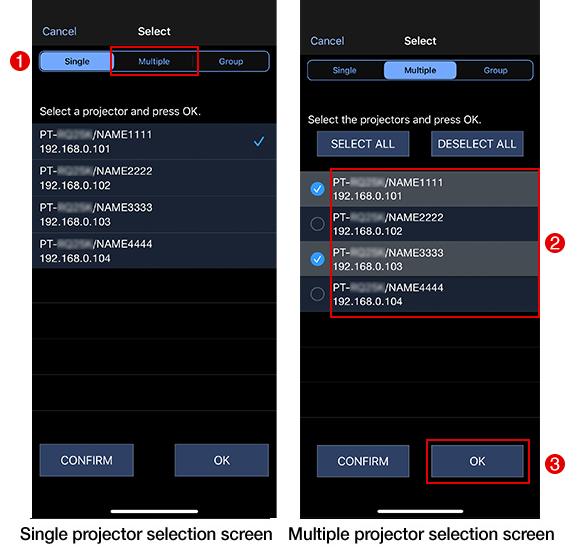

- Selects all registered projectors.

- Cancels the selection.
1) Tap [Multiple].
- The multiple projector selection screen appears.
2) Tap the names of all projectors that you want to operate.
- The selected projectors are indicated with a "
 " mark on their left side.
3) Tap the [OK] button.
- The Control screen appears.
Notice
- Depending on the application software operating status, the previously displayed operation screen may appear, instead of the Control screen.
- For projectors with the [CONFIRM] button displayed, tapping the button allows you to confirm the corresponding projector.
Standby state: The power indicator of the corresponding projector flashes.
Projection state: The power indicator of the corresponding projector flashes, and the projector name is projected on the projector's on-screen menu.
When selecting a group
Tap the [Control] button on the [Top] screen to display the [Select] screen (projector selection screen).
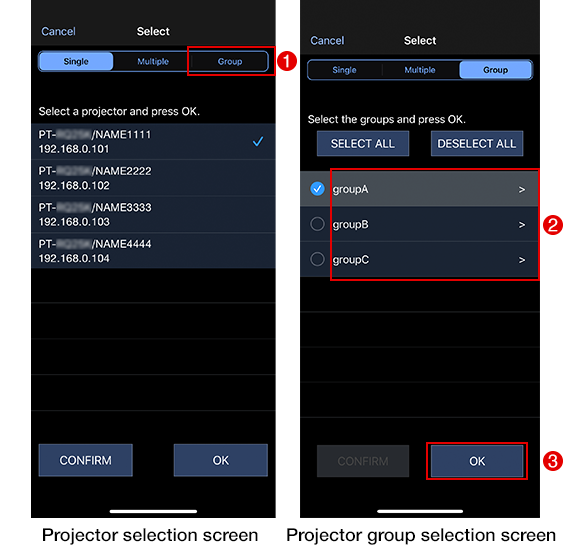
- Selects all registered groups.
- Cancels the selection.
1) Tap the [GROUP] button.
- A list of registered groups appears.
2) Tap the names of all groups that you want to operate.
- The selected projectors are indicated with a "" mark on their left side.
3) Tap the [OK] button.
- The Control screen appears.
Notice
- Depending on the application software operating status, the previously displayed operation screen may appear, instead of the Control screen.
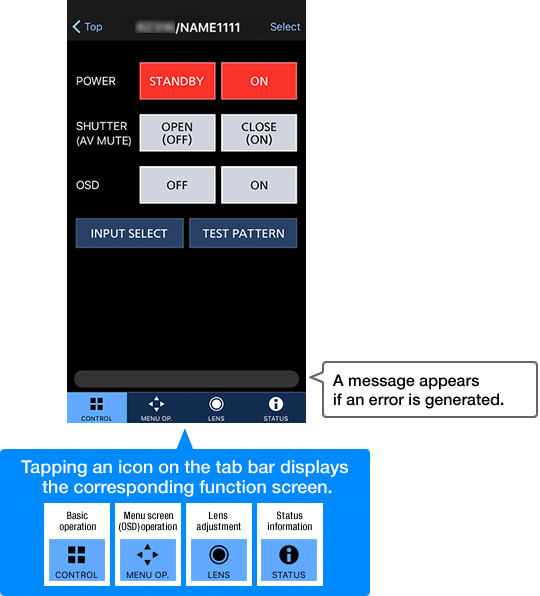
Projector operation
When you specify the projector(s) you want to operate in the single projector selection screen or multiple projector selection screen, the operation screen for the selection of the Control screen or other screens appears. Tap an icon on the tab bar at the bottom of the screen to display the corresponding function screen.
Note: Please refer to projector's Operating Instructions for projector's function settings.

- Displays the single projector selection screen/multiple projector selection screen.
Basic operation
The Control screen is used to perform basic projector operations. The screen allows you to perform general projector operations, such as power ON/OFF and input switching.
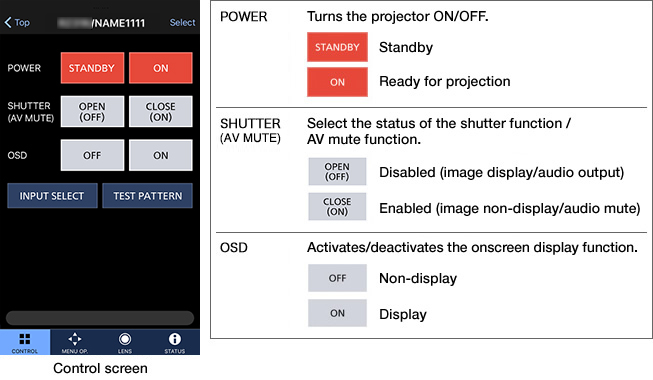

- Displays the input selection screen.
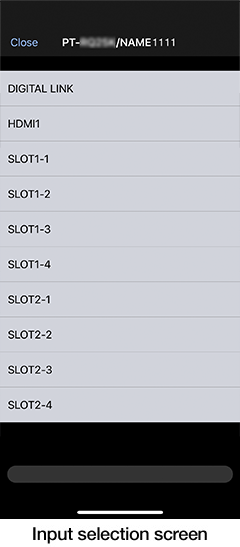
Select the image content you want to display with the projector.
The names of inputs displayed on the input selection screen may not correspond with the names of input terminals indicated on the projector unit.

- Displays the test pattern screen.
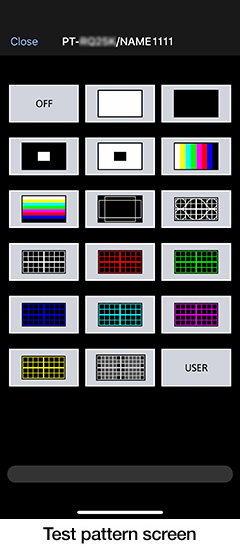
Select the test pattern to be projected by the projector. The selected test pattern is displayed on the screen. The displayed test pattern can be turned off by tapping the [OFF] button. Note that only the built-in test patterns in the projector in operation can be displayed.
・The user test patterns registered to the selected projector can be displayed by tapping the [USER] button. (This is enabled only for a model with the [USER] button displayed.)
・The displayed test pattern can be turned off by tapping the [OFF] button.
Menu screen (OSD) operation
The following screens are used to operate the menu screen of the projector. By tapping a button in the screen, you can operate the projector as if using the remote control of the projector.
The operation screen can be switched by using the [OPERATION] or [NUMBER] button.
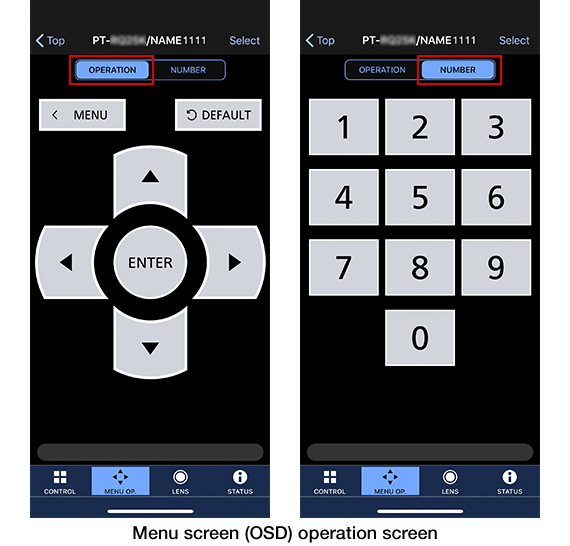
Notice
- Keeping your finger on the ▲/▼/◀/▶ button results in a continuous operation of the respective function in the same way as pressing and holding the button on the remote control. Note that if the communication is unstable or multiple projectors have been selected, the operation may not be smooth.
Lens adjustment
■ Lens adjustment sheet

- : Supported

- : Partially Supported
- −
- : Unsupported
| Compatible projectors |    |
 |
 |
 |
 |
 |
 |
|---|---|---|---|---|---|---|---|
| PT-RQ50K | |
|
*1 |
|
*2 |
|
|
| PT-RQ45K Series | |||||||
| PT-RQ35K2 Series | |||||||
| PT-RQ35K Series | |||||||
| PT-RQ32K | |
− | *1 |
|
*2 |
*3 |
|
| PT-RZ31K Series |
|||||||
| PT-RQ25K Series | |
|
*1 |
|
*2 |
|
|
| PT-RQ22K | |
*7 |
*1 |
|
*2 |
|
|
| PT-RZ21K Series |
|
*7 |
*1 |
|
*2 |
*3 |
|
| PT-RZ16K | |||||||
| PT-RZ14K | |
|
*1 |
|
*2 |
|
|
| PT-REQ15 Series |
|||||||
| PT-REZ15 Series |
|||||||
| PT-RQ7 Series |
|
|
|
|
*4 |
− | − |
| PT-RCQ10 Series |
|||||||
| PT-RZ120 | |
*7 |
|
|
*4 |
− | − |
| PT-RZ990 Series | |
|
|
|
*4 |
− | − |
| PT-MZ20K Series |
*6 |
|
*5 |
|
*4 |
|
|
| PT-MZ16K Series |
|||||||
| PT-MZ882 Series |
|
|
|
|
− | − | − |
| PT-MZ880 Series |
|||||||
| PT-MZ770 Series |
|
− | *5 |
|
− | − | − |
| PT-MZ670 Series |
*1 [LENS TYPE] may not be selectable depending on your projector lens.
*2 Lens position data may not be obtainable, or the lens position adjusted, depending on your projector lens.
*3 Information is not displayed for lens positions saved in the lens memory.
*4 [Zoom] (Zoom position) and [Focus] (Focus position) cannot be selected.
*5 [LENS TYPE] cannot be selected.
*6 In this application software, the operation of periphery focus adjustment function (adjustment of the focal balance between the center and periphery areas of the screen) cannot be performed.
*7 Some functions may not be available depending on your projector’s firmware version.
In the following case, this function is not available. It becomes available by updating the firmware version.
• PT-RZ120: When the main version is 2.01 or lower.
• PT-RQ22K: When the main version is lower than 5.00.
• PT-RZ21K Series: When the main version is lower than 4.00.
• PT-RZ16K: When the main version is lower than 2.00.
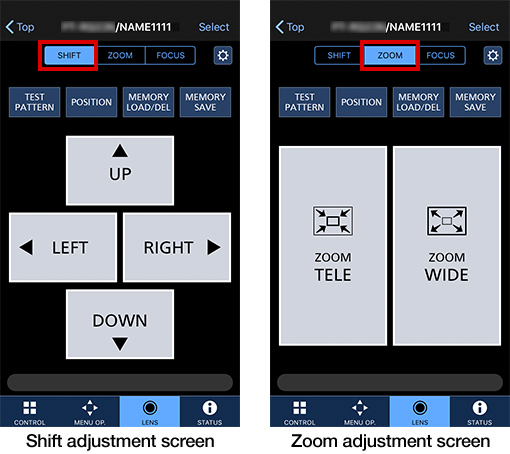
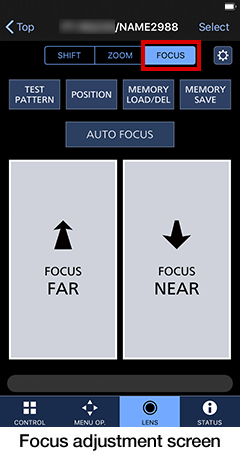
Adjust the lens of the projector, then switch to desired screen adjustment (shift adjustment screen / zoom adjustment screen / focus adjustment screen) by tapping the [SHIFT], [ZOOM], or [FOCUS] button.
The screen differs depending on the projector model.
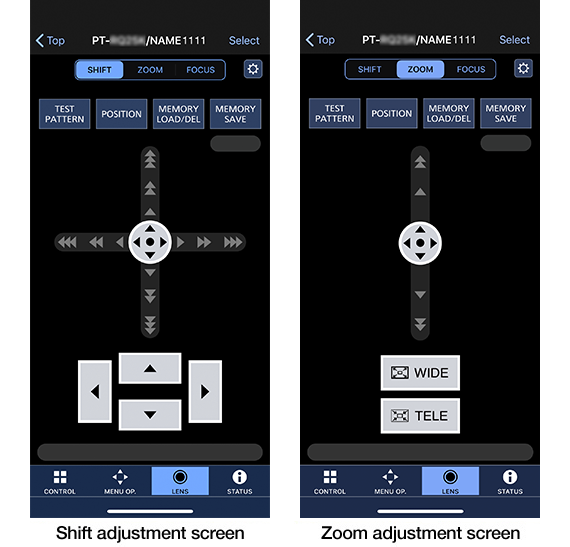
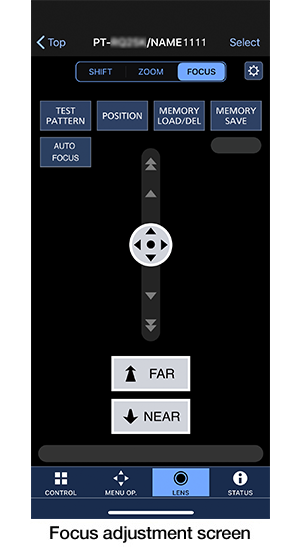
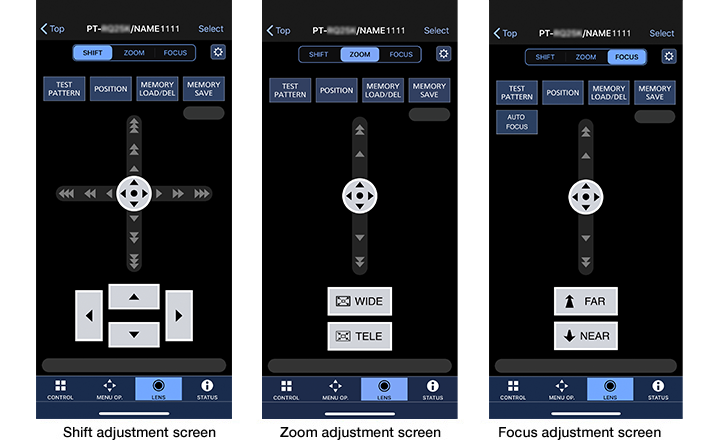
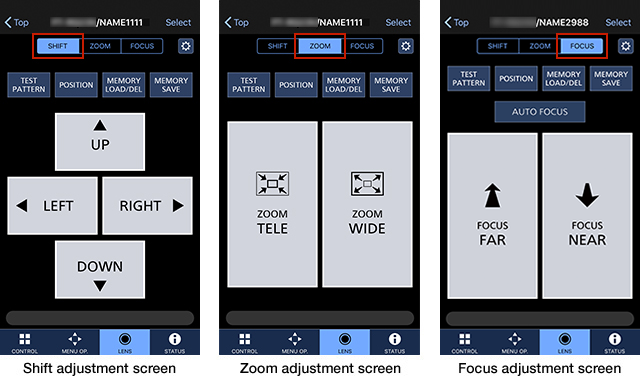
Notice
- Keeping your finger on the ▲/▼/◀/▶, [TELE]/[WIDE], [FAR]/[NEAR], SHIFT[UP]/[DOWN]/[LEFT]/[RIGHT], [ZOOM TELE]/[ZOOM WIDE], or [FOCUS FAR]/[FOCUS NEAR] button results in an accelerated operation of the respective function in the same way as pressing and holding the button on the remote control. Note that if the communication is unstable or multiple projectors have been selected, the operation may not be smooth.
Lens focus position can be adjusted automatically using the device’s camera function.
・This function may not be compatible with some projector models. Please refer to ■ Lens adjustment sheet
for more information on projector compatibility.
・Depending on the capability of the camera built into the device, this function may not work correctly. Operation with the following devices has been confirmed.
iOS: iPhone 12 / iPhone X / iPhone XS / iPhone XR
Android: Google Pixel 7a / Google Pixel 5 / Google Pixel 3a / Google Pixel 3 / Samsung Galaxy S10
・In the following cases, auto focus adjustment may not be performed properly. Display the auto adjustment screen and change the settings before adjusting the focus automatically. - When the projector’s on-screen menu is displayed - When the Custom Masking function is set to ON
・This function cannot be used when multiple projectors are selected for the projectors you want to operate. Please select one projector.
■ Adjust the focus automatically
Tap the [AUTO FOCUS] button on the focus adjustment screen to display the operation guidance screen.
Tap the screen after confirming the operation procedure. The auto adjustment screen appears.
- The operation guidance screen appears at first selection only.
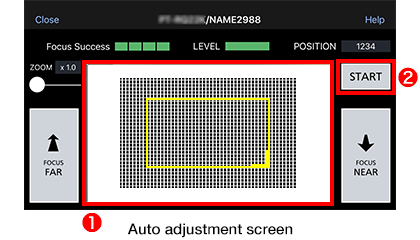
1) Match the screen you want to adjust automatically to the part the camera displays.
- Please make the screen you want to adjust automatically larger than the yellow frame.
- You can designate the camera’s zoom magnification or the range of focus adjustment by adjusting the position or size of the yellow frame.
- When using iPhone, you can improve the resolution of the projection screen during long-distance shooting by using the camera’s zoom magnification.
Compatible devices: iPhone 12 Pro / iPhone 11 Pro Max / iPhone 11 Pro / iPhone XS Max / iPhone XS / iPhone X / iPhone 8 Plus / iPhone 7 Plus
2) Tap the [START] button.
- The projector’s display switches to a test pattern for auto focus, and focus adjustment commences automatically.
- Progress status is displayed during auto adjustment.
- Auto adjustment screen appears after completing adjustment.
- To clear the test pattern for auto focus after completing adjustment, please push the MENU button on the menu screen operation or the test pattern OFF button.
- Auto Adjustment Progress Status
-

- Initializing

- Scanning

- Adjusting
- Adjustment Result
-

- Auto adjustment has succeeded.

- Auto adjustment has failed.

- Cancel
- Focus Position Adjustment Result
-

- Focus has been adjusted.

- Focus is slightly off.

- Focus has not been adjusted.
Notice
- Don’t move the device and the projector during auto adjustment. We recommended using a tripod for precise adjustment.
- After completing auto adjustment, the focus position can be slightly adjusted by pushing the FOCUS FAR/NEAR button.
- To obtain the necessary contrast for focus adjustment, please try zooming from as low a magnification as possible.
- When using the PT-RQ50K, PT-RQ45K Series, PT-RQ35K2 Series, PT-RQ35K Series, PT-RQ25K Series, PT-RQ22K, PT-RZ21K Series, PT-RZ16K, or PT-RZ14K please set the picture mode to [DYNAMIC].
- The recommended distance from the device to the projection screen is up to 30 m.
- When the distance between the device and the projection screen is too close, or the projection screen is too bright, rainbow noise may appear. This is due to the device’s failure to adjust light volume at the camera function.
Try increasing the distance to the screen or brightening the ambient environment to reduce rainbow noise. - When auto adjustment result is displayed as “Focus Error”, it is possible that auto adjustment failed due to hand movement or other causes. Please perform the adjustment again.
- When the focus LEVEL meter is displayed as yellow, precision may not be guaranteed because the necessary contrast cannot be obtained for focus adjustment. When the focus LEVEL meter is displayed as red, focus adjustment cannot be performed. Please use this function in an environment where the focus LEVEL meter is green by changing ambient brightness or distance to the projection screen.
- The device may become hot when the auto adjustment screen is displayed for a long time. In this case, please close the application software and wait for a while before using it.
- Tap [Help] to display the operation guidance screen.
From the lens setting screen, the projector lens can be moved to its home position, or the range of adjustment calibrated, by examining the limiting value for lens adjustment.
・This function may not be compatible with some projector models. Please refer to ■ Lens adjustment sheet for more information on projector compatibility.
■ Move to home position
Tap the ![[LENS SETTING]](img/icn_lenssetting_up.png) icon on the top right of the Adjustment Screen (Shift Adjustment Screen / Zoom Adjustment Screen / Focus Adjustment Screen) to display the [LENS SETTING] screen.
icon on the top right of the Adjustment Screen (Shift Adjustment Screen / Zoom Adjustment Screen / Focus Adjustment Screen) to display the [LENS SETTING] screen.
- [LENS TYPE] currently selected is displayed on screen. Lens type varies depending on your projector or projector lens.
- Change the settings for [LENS TYPE] when the lens type shown on screen does not correspond to yours.
- Skip ahead to Step 2 if the settings for [LENS TYPE] are unchanged.
![[LENS SETTING]screen](img/img_pjope09.png)
1) Tap [SET] after selecting the appropriate lens or lens type
- [LENS TYPE] may not be selected or displayed depending on your projector or projector lens.
2) Tap [LENS HOME POSITION]
- A confirmation message is displayed.
3) Tap [OK] to confirm
- Projector lens moves to the original position.
■ Perform lens calibration
Tap the icon on the top right of the Adjustment Screen (Shift Adjustment Screen / Zoom Adjustment Screen / Focus Adjustment Screen) to display the [LENS SETTING] screen.
- [LENS TYPE] currently selected is displayed on screen. Lens type varies depending on your projector or projector lens.
- Change the settings for [LENS TYPE] when the lens type shown on screen does not correspond to yours.
- Skip ahead to Step 2 if settings for [LENS TYPE] are unchanged.
![[LENS SETTING]screen](img/img_pjope10.png)
1) Tap [SET] after selecting the appropriate lens or lens type
- [LENS TYPE] may not be selected or displayed depending on your projector or projector lens.
2) Tap [LENS CALIBRATION ALL]
- A confirmation message is displayed.
3) Tap [OK] to confirm
- Lens calibration commences.
- The projector lens moves to the home position after adjustment range calibration is complete.
Notice
- When your projector is PT-MZ880 Series with the standard zoom lens attached, please select [ET-ELS20] in [LENS TYPE].
- [LENS HOME POSITION] will not work correctly if [LENS TYPE] settings are incorrect.
- Projector lens will not move to the correct home position unless [LENS CALIBRATION ALL] has been performed.
- Home position varies depending on the lens type. For more details, please check your projector Operating Instructions.
- The original position of lens mounter and the home position of projector lens are automatically reloaded once lens shift has been calibrated. The home position is defined as an original position measured vertically and horizontally based on calibration data. Home position does not necessarily conform to the optical center position on screen.
Test pattern screen is displayed.
For more details, refer to [Test Pattern] in [Basic Operation].
Lens position can be adjusted by obtaining information on the current lens position or by entering numeric values.
・This function may not be compatible with some projector models. Please refer to ■ Lens adjustment sheet for more information on projector compatibility.
・The displayed information on lens positions differs depending on your projector model or projector lens.
■ To obtain information on the current lens position
Tap the [POSITION] button on the Adjustment Screen (Shift Adjustment Screen / Zoom Adjustment Screen / Focus Adjustment Screen) to display the [LENS POSITION] screen.
- Information on the current lens position ([Vertical], [Horizontal], [Zoom], [Focus]) is displayed.
■ To adjust by entering information on the current lens position
Tap the [POSITION] button of the Adjustment Screen (Shift Adjustment Screen / Zoom Adjustment Screen / Focus Adjustment Screen) to display the [LENS POSITION] screen.
- Information on the current lens position ([Vertical], [Horizontal], [Zoom], [Focus]) is displayed.
![[LENS POSITION] Screen](img/img_pjope11.png)
1) Enter numeric values in the information box for desired lens-position adjustment.
2) Tap the [APPLY] button to perform lens-position adjustment according to numeric values entered.
- Screen automatically moves to the lens-position values entered for (Vertical, Horizontal, Zoom, Focus).
Notice
- Depending on your projection lens, information on the current lens position may not be displayed and the ability to change its position by entering numerical values may not be supported.
- This function cannot be used when multiple projectors are selected.
- Tap the [GET] button to display current lens position information before pressing the [APPLY] button.
[Information on the lens position saved in the lens memory] can be loaded or deleted.
・This function may not be compatible with some projector models. Please refer to ■ Lens adjustment sheet for more information on projector compatibility.
■ To load [Information on the lens position saved in the lens memory]
Tap the [MEMORY LOAD/DEL] button on the Adjustment Screen (Shift Adjustment Screen / Zoom Adjustment Screen / Focus Adjustment Screen) to display the [LENS MEMORY LOAD/DELETE] screen.
- [-] is displayed in the Information Box for lens position ([Vertical Position], [Horizontal Position], [Zoom Position], [Focus Position]).
![[LENS MOMORY LOAD/DELETE]Screen (Load mode)](img/img_pjope12_pc.png)
![[LENS MOMORY LOAD/DELETE]Screen (Load mode)](img/img_pjope12.png)
![[LENS MOMORY LOAD/DELETE]Screen (Load mode)](img/img_pjope13.png)
● For the PT-RQ50K, PT-RQ45K Series, PT-RQ35K2 Series, PT-RQ35K Series, PT-RQ25K Series, PT-RQ22K, PT-RZ14K, PT-REQ15 Series, PT-REZ15 Series, PT-MZ20K Series, and PT-MZ16K Series
1) Tap the number to load.
- Selectable number buttons (which access saved lens-memory data) tapped are underlined in blue (example
 ).
). - Number button tapped is displayed in blue (example
 ).
). - Information on the saved lens position ([Vertical Position], [Horizontal Position], [Zoom Position], [Focus Position]) is displayed.
2) Tap the [LOAD] button.
- Confirmation screen appears.
3) Tap the [OK] button on the confirmation screen.
- The screen automatically moves to the lens position (Vertical, Horizontal, Zoom, Focus) loaded in the lens memory.
● For models compatible with MEMORY LOAD/DELETE other than those on the left
1) Tap the number to load.
- Number button tapped is displayed in blue (example
 ).
). - [-] is displayed in the Information Box for the lens position ([Vertical Position], [Horizontal Position], [Zoom Position], [Focus Position]).
2) Tap the [LOAD] button.
- Confirmation screen appears.
3) Tap the [OK] button on the confirmation screen.
- The screen automatically moves to the lens position (Vertical, Horizontal, Zoom, Focus) loaded in the lens memory.
- If lens-memory data is not saved for the number you tapped, the screen will not move to the lens position.
Notice
- This function cannot be used when multiple projectors are selected.
- Regarding lens memory, 100% repeatability is not guaranteed. Load the lens memory, then adjust the focus, zoom, and lens shift again to suit usage conditions.
■ To delete [Information on the lens position saved in the lens memory]
Tap the [MEMORY LOAD/DEL] button of the Adjustment Screen (Shift Adjustment Screen / Zoom Adjustment Screen / Focus Adjustment Screen) to display the [LENS MEMORY LOAD/DELETE] screen.
- [-] is displayed in the Information Box for the lens position of the [LENS MEMORY LOAD/DELETE] screen.
![[LENS MOMORY LOAD/DELETE]Screen (Delete mode)](img/img_pjope14_pc.png)
![[LENS MOMORY LOAD/DELETE]Screen (Delete mode)](img/img_pjope14.png)
![[LENS MOMORY LOAD/DELETE]Screen (Delete mode)](img/img_pjope15.png)
● For the PT-RQ50K, PT-RQ45K Series, PT-RQ35K2 Series, PT-RQ35K Series, PT-RQ25K Series, PT-RQ22K, PT-RZ14K, PT-REQ15 Series, PT-REZ15 Series, PT-MZ20K Series, and PT-MZ16K Series
1) Tap the number to delete.
- Selectable number buttons tapped are underlined in blue (example ).
- Number button tapped is displayed in blue (example ).
- Information on the saved lens position ([Vertical Position], [Horizontal Position], [Zoom Position], [Focus Position]) is displayed.
2) Tap the [DELETE] button.
- Confirmation screen appears.
3) Tap the [OK] button on the confirmation screen.
- Deletion of the lens memory selected is completed.
● For models compatible with MEMORY LOAD/DELETE other than those on the left
1) Tap the number to delete.
- The number button tapped is displayed in blue (example ).
- [-] is displayed in the Information Box for the lens position ([Vertical Position], [Horizontal Position], [Zoom Position], [Focus Position]).
2) Tap the [DELETE] button.
- Confirmation screen appears.
3) Tap the [OK] button of the confirmation screen.
- Deletion of the selected lens memory is completed.
Notice
- This function cannot be used when multiple projectors are selected.
The current lens position can be saved in the lens memory.
・This function may not be compatible with some projector models. Please refer to ■ Lens adjustment sheet for more information on projector compatibility.
・The displayed information on lens positions differs depending on your projector model or projector lens.
■ Saving current lens position
Tap the [MEMORY SAVE] button on the Adjustment Screen (Shift Adjustment Screen / Zoom Adjustment Screen / Focus Adjustment Screen) to display the [LENS MEMORY SAVE] screen.
- Information on the current lens position ([Vertical Position], [Horizontal Position], [Zoom Position], [Focus Position]) is displayed.
![[LENS MOMORY SAVE]Screen](img/img_pjope16_pc.png)
![[LENS MOMORY SAVE]Screen](img/img_pjope16.png)
![[LENS MOMORY SAVE]Screen](img/img_pjope17.png)
● For the PT-RQ50K, PT-RQ45K Series, PT-RQ35K2 Series, PT-RQ35K Series, PT-RQ25K Series, PT-RQ22K, PT-RZ14K, PT-REQ15 Series, PT-REZ15 Series, PT-MZ20K Series, and PT-MZ16K Series
1) Tap the number to save.
- The number buttons already saved in the lens memory are underlined in blue (example
 ).
). - Only the number is displayed for those number buttons not saved in the lens memory (example
 ).
). - Number button tapped is displayed in blue (example
 ).
).
2) Tap the [SAVE] button.
- Confirmation screen appears.
3) Tap the [OK] button on the confirmation screen.
- Saving lens memory is completed.
● For models compatible with MEMORY SAVE other than those on the left
1) Tap the number to save.
- Number button tapped is displayed in blue (display example ).
2) Tap the [SAVE] button.
- Confirmation screen appears.
3) Tap the [OK] button on the confirmation screen.
- Saving lens memory is completed.
Notice
- Tap the [MEMORY LOAD/DEL] button of the Adjustment Screen (Shift Adjustment Screen / Zoom Adjustment Screen / Focus Adjustment Screen), then select the number to confirm [Information on the lens position saved in the lens memory]. (For the PT-RQ50K, PT-RQ45K Series, PT-RQ35K2 Series, PT-RQ35K Series, PT-RQ25K Series, PT-RQ22K, PT-RZ14K, PT-REQ15 Series, PT-REZ15 Series, PT-MZ20K Series, and PT-MZ16K Series only)
- For models compatible with MEMORY SAVE other than the PT-RQ50K, PT-RQ45K Series, PT-RQ35K2 Series, PT-RQ35K Series, PT-RQ25K Series, PT-RQ22K, PT-RZ14K, PT-REQ15 Series, PT-REZ15 Series, PT-MZ20K Series, and PT-MZ16K Series, lens position information saved to the lens memory is not displayed. Before saving, we recommended recording/storing the number you want to save together with [Information on the lens position saved in the lens memory] obtained via the [LENS POSITION] screen.
- This function cannot be used when multiple projectors are selected.
- Up to 10 numbers can be saved in the lens memory. Depending on the projector model, only three can be saved.
Status information
This screen displays the projector status information.
If multiple projectors have been selected, the status screen is not displayed.
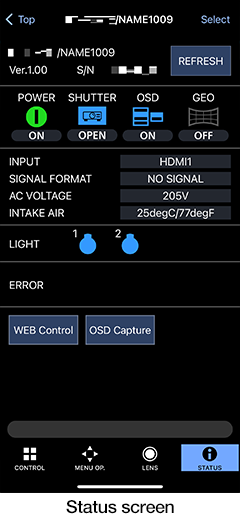
Status information
- ・Projector type/name
- ・Firmware version or main version of firmware
- ・Serial no.
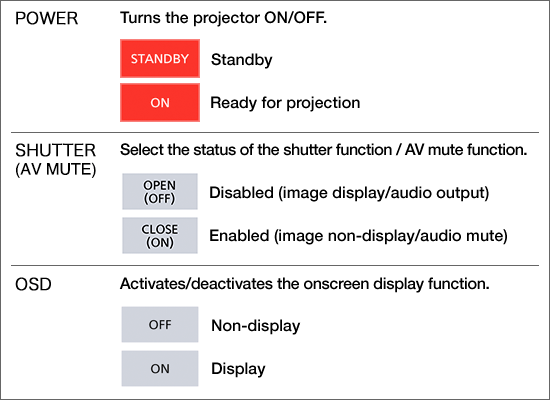
- POWER
- Projector power ON/OFF status
- SHUTTER
- Image display status
- [OPEN]
- Image displayed
- [CLOSE]
- Image not displayed
- OSD
- Status of onscreen display function
- GEO
- Geometric distortion correction function setting
- INPUT
- Currently selected input terminal
- SIGNAL FORMAT
- Format of input signal
- AC VOLTAGE
- Input power supply voltage
- INTAKE AIR
- Intake air temperature
- LIGHT
- Light source ON status
- ERROR
- Error/warning generation
(Icon is displayed when error/warning is generated.)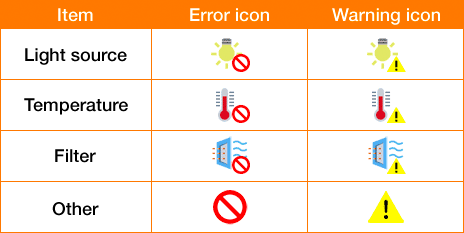

- Displays the error information page of the Web Control screen. This button is displayed only when error/warning has been generated.
For more details on the error information page of the Web Control screen, please check your projector Operating Instructions.

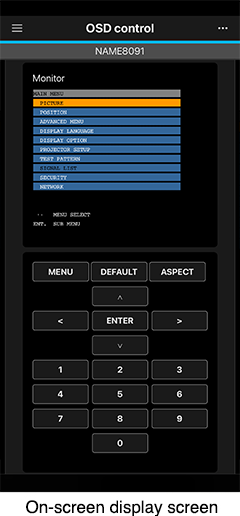
- Displays the Web Control screen of the projector.

- Allows you to view and operate the projector's menu screen (OSD) via a web browser.

- Refreshes the status information.
Notice
- When you click the [WEB Control] or [OSD Capture] button, an authentication screen will appear before the Web Control screen or on-screen display screen is displayed. Enter the user name and password set on the projector currently in operation in [User Name] and [Password].
- If both error and warning have been generated, the error icon is displayed.
- Regarding the measure to take when an error/warning is generated, refer to the Operating Instructions for the projector in use.
Setting application software
Confirm the application software settings and version information.
Setting of Auto Registration function
Enabling the auto registration function of the application software eliminates the need to enter the user name, password, PJLink password and command port no. when you register a projector selected from the network search results. Tap the [SETUP] button on the [Top] screen to display the [Setup] screen.
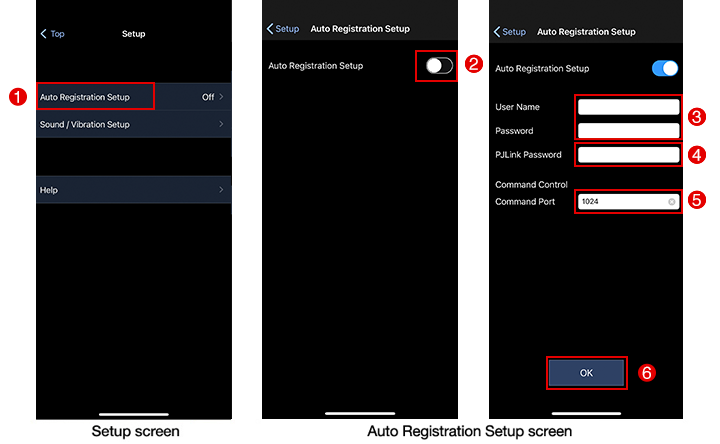

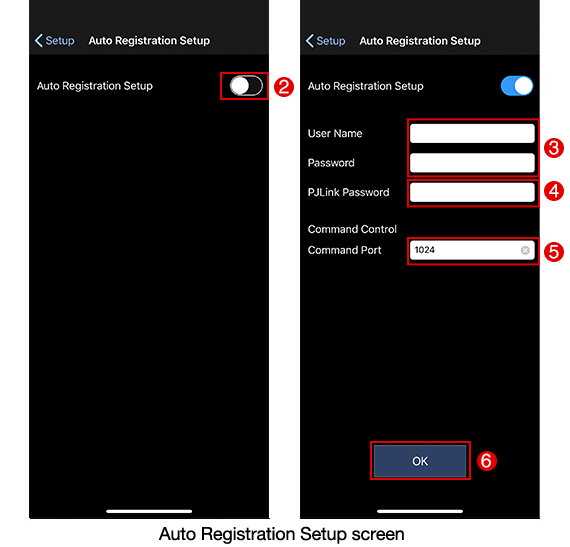
1) Tap [Auto Registration Setup].
- The [Auto Registration Setup] screen appears.
2) Tap the [Auto Registration Setup] switch to turn it to ON.
- Input and editing of data in [User Name], [Password], [PJLink Password] and [Command Port] is possible.
3) Enter the user name and password in [User Name] and [Password].
- Enter the user name and password with administrator authority or administrator account set in the projector.
4) Enter the PJLink password in [PJLink Password].
- Enter the password for PJLink set in the projector to be registered.
- The password used for PJLink may be same as the one set in Web Control, or set individually as "PJLink Password" depending on the projector model. Regarding the PJLink security authentication, please check your projector Operating Instructions.
5) Enter the command port no. in [Command Port].
- Enter the command port no. (port no. of port used for command control) set in the projector.
6) Tap the [OK] button.
- Registration of the settings is completed.
Setting of sound and vibration
The device’s sound and vibration notify when the CONTROL/MENU OP./LENS/STATUS icon is pressed on the Control screen.
Tap the [SETUP] button on the [Top] screen to display the [Setup] screen.
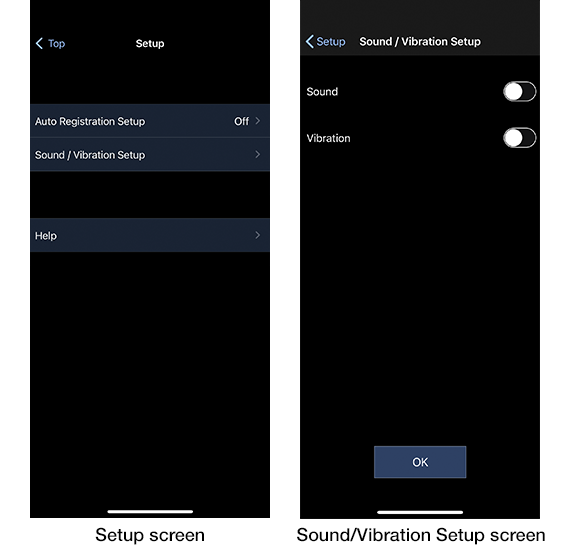
1) Tap the [Sound/Vibration Setup] button.
- The [Sound/Vibration Setup] screen appears.
2) Tap the [Sound] or [Vibration] switch to turn it to [ON].
3) Tap the [OK] button.
- Registration of the settings is completed.
Help screen
This screen shows the version of the application software or license.
Tap the [SETUP] button on the [Top] screen to display the [Setup] screen.
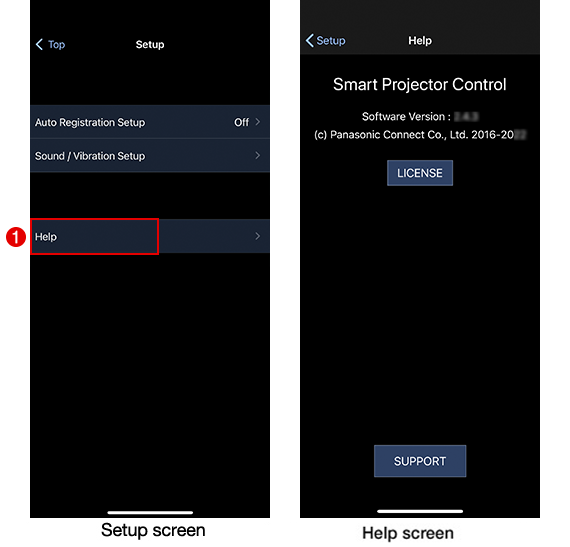

- License text of the open-source software used for the application software is displayed.

- Links to the website confirming how to register or operate.
1) Tap [Help].
- The [Help] screen appears.
